This VLESS Reality setup guide came out of six months of tanking reach. My Instagram and Facebook posts that used to get 5,000+ impressions were barely hitting 1,000. I’d been using Surfshark, and it worked great at first. But over time, social platforms got better at detecting commercial VPN services and started throttling accounts that connected through them.
It became clear: I needed my own VPN with a US residential IP address. Not some $5 datacenter IP that instantly lands on blacklists, but a real ISP address, indistinguishable from a regular American user.
Why VLESS + Reality Instead of a Regular VPN
Before diving into the how-to, let me explain why I went with this particular setup. Standard VPN protocols (OpenVPN, WireGuard, even vanilla VLESS) have recognizable traffic signatures. ISPs and DPI (Deep Packet Inspection) systems have learned to spot them. In Russia, this kind of traffic gets blocked outright, and social networks lower their trust scores for such connections.
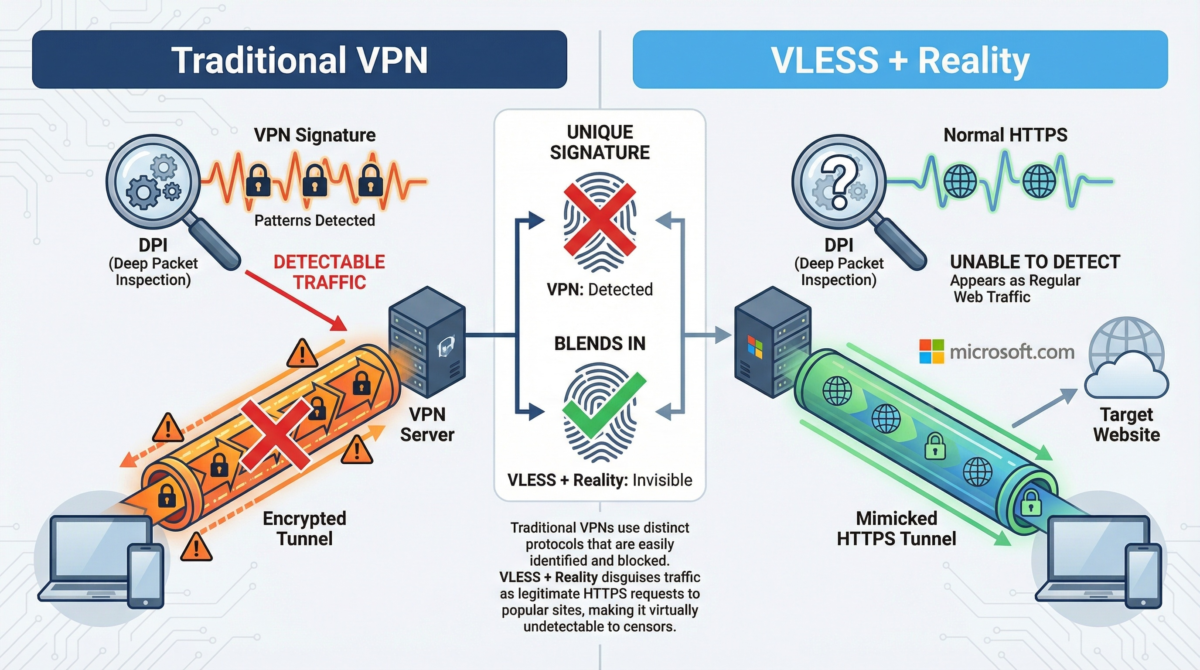
Reality works differently. It doesn’t just encrypt your traffic—it completely disguises it as a normal HTTPS connection to a legitimate website. When I configure Reality with Dest: www.microsoft.com:443, here’s what happens: to any outside observer (your ISP, firewalls, anti-fraud systems), my traffic looks exactly like I’m just visiting Microsoft’s website. Same TLS fingerprints, same port 443, same certificates. Telling this connection apart from an actual visit to microsoft.com is virtually impossible.
That’s why Reality doesn’t get blocked even in China and Iran, where VPN traffic is filtered aggressively. And that’s exactly why social networks can’t tell I’m using a proxy.
Why Run Your Own VPS Instead of Using Off-the-Shelf Solutions
I considered three options:
- Residential proxies with pay-per-traffic pricing. Providers like Bright Data or IPRoyal charge $8 to $15 per gigabyte. With heavy social media use, that easily adds up to $50–100 a month. Plus, the IP addresses keep rotating, which looks suspicious to social platforms.
- Static residential proxies. These run $15 to $25 per month for a single IP. Not a bad option, but you only get a proxy with no ability to customize anything.
- VPS with a residential IP. For the same $25, you get a full server with root access where you can deploy any configuration you want. This is what I went with.
Finding a Provider: Where to Get a VPS with a Real Residential IP
This turned out to be the hardest part. Most hosting providers sell regular datacenter IPs that every anti-fraud system flags instantly. I needed an IP that shows up as ISP (Internet Service Provider) in ip2location and MaxMind databases, not DCH (Data Center Hosting).
After researching the market, I settled on SolaDrive. They have a dedicated “Residential IP VPS” line with IP addresses from US providers: Windstream, AT&T, Spectrum.
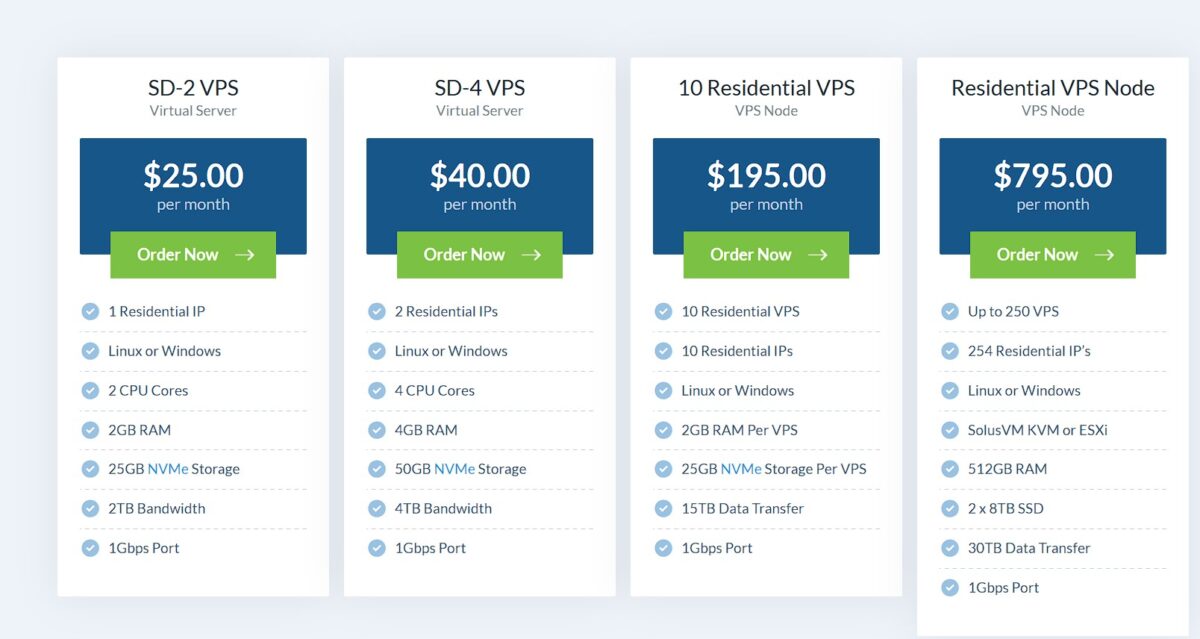
The entry-level SD-2 plan at $25/month includes:
- 1 Residential IP
- 2 CPU cores
- 2 GB RAM
- 25 GB NVMe
- 2 TB bandwidth
- 1 Gbps port
More than enough for my needs.
First Problem: Order Blocked at Checkout
I place the order, select Ubuntu 24.04, enter my details, pay with card via Stripe. And I get this:
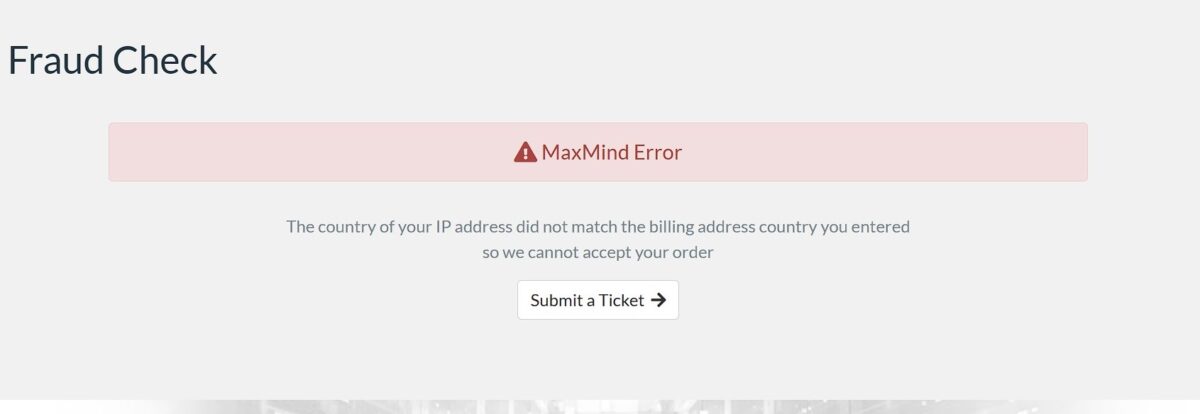
SolaDrive’s anti-fraud system blocked my order. The reason: I was checking out while connected to a Kazakhstan VPN, but my billing address showed my real location. The system spotted the mismatch between my IP geolocation and billing address.
I contacted support, explained the situation. Half an hour later, they lifted the block and my order went through.
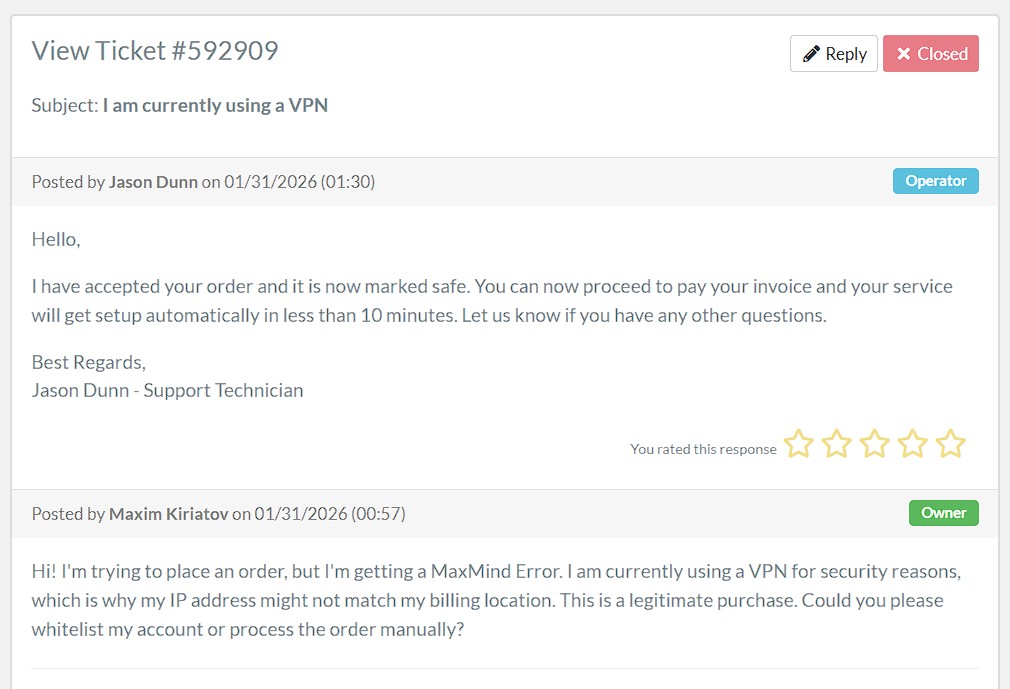
Pro tip: if you’re ordering a VPS from a Western provider, either use a VPN with an IP from your billing address country, or just reach out to support right after getting blocked. This is a common situation and gets resolved quickly.
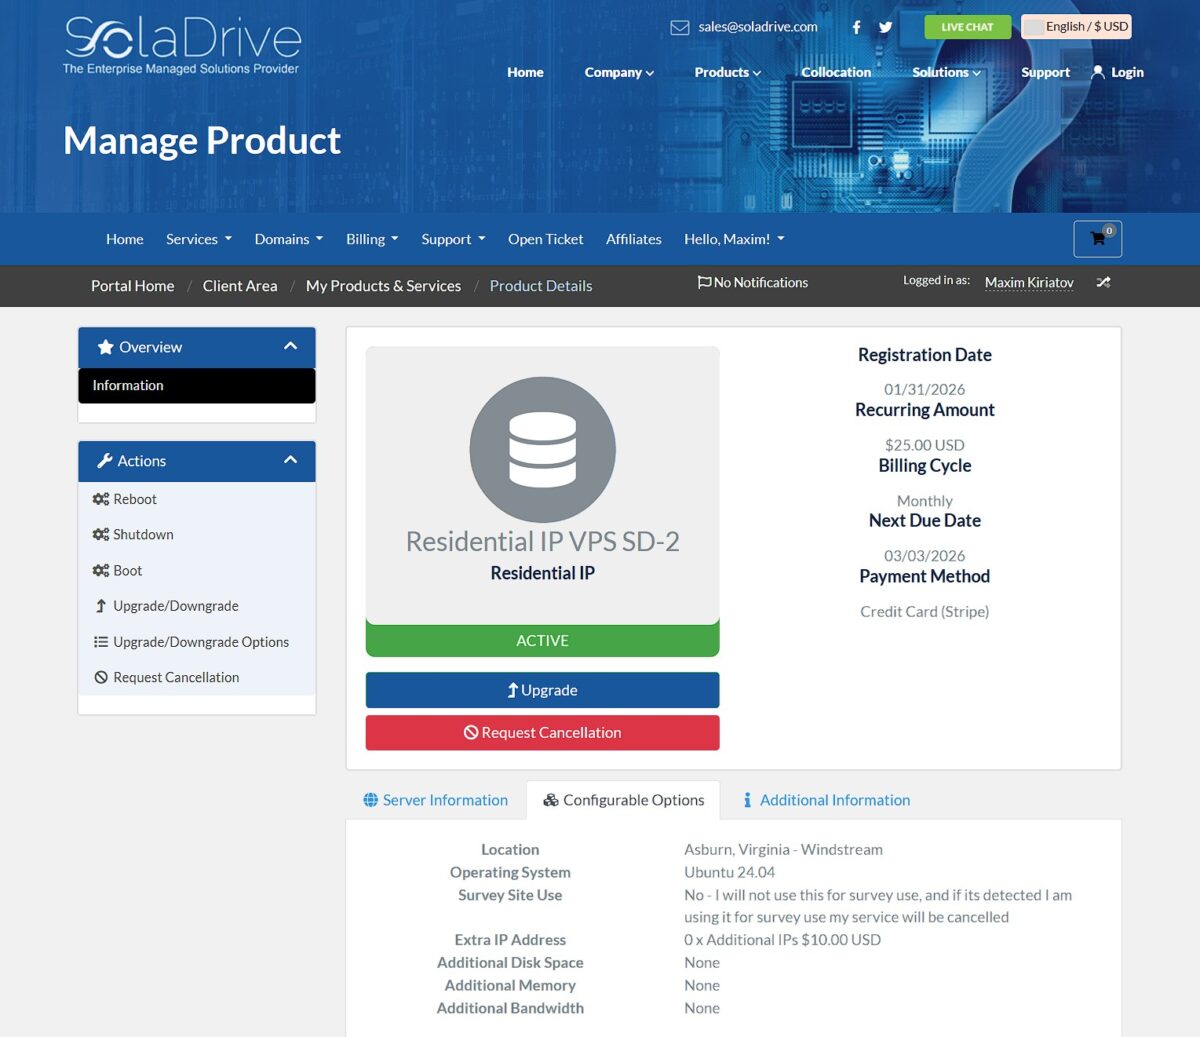
Getting Server Access
After the unblock, SSH credentials arrive in my email. In the SolaDrive control panel, I can see my active server:
Installing 3X-UI and Configuring VLESS + Reality
I SSH into the server and start setting things up. First, I update the system and create a separate user instead of using root:
apt update && apt full-upgrade -y
adduser maxim
usermod -aG sudo maxim
I change the SSH port to something non-standard and disable root login for security:
nano /etc/ssh/sshd_configFind and change:
Port 35661
PermitRootLogin no
Restart SSH:
systemctl restart sshExtra Security: SSH Key Authentication
Changing the port and disabling root is good, but for bulletproof security, you should disable password login entirely and use SSH keys only. Bots manage to brute-force passwords even on non-standard ports. With keys, that’s simply not possible.
On my local machine, I generate a key:
ssh-keygen -t ed25519 -C "my-vps-key"Copy the public key to the server:
ssh-copy-id -p 35661 maxim@SERVER_IPThen add this to sshd_config:
PasswordAuthentication no
PubkeyAuthentication yes
Now the server is 100% protected from brute-force attacks. You can only connect from a machine that has the private key.
Now I install the 3X-UI panel:
sudo su -
bash <(curl -Ls https://raw.githubusercontent.com/mhsanaei/3x-ui/master/install.sh)
The installer asks about port and SSL. For now, I skip SSL—I’ll set up the certificate later. After installation, I get a link to the panel, login, and password.
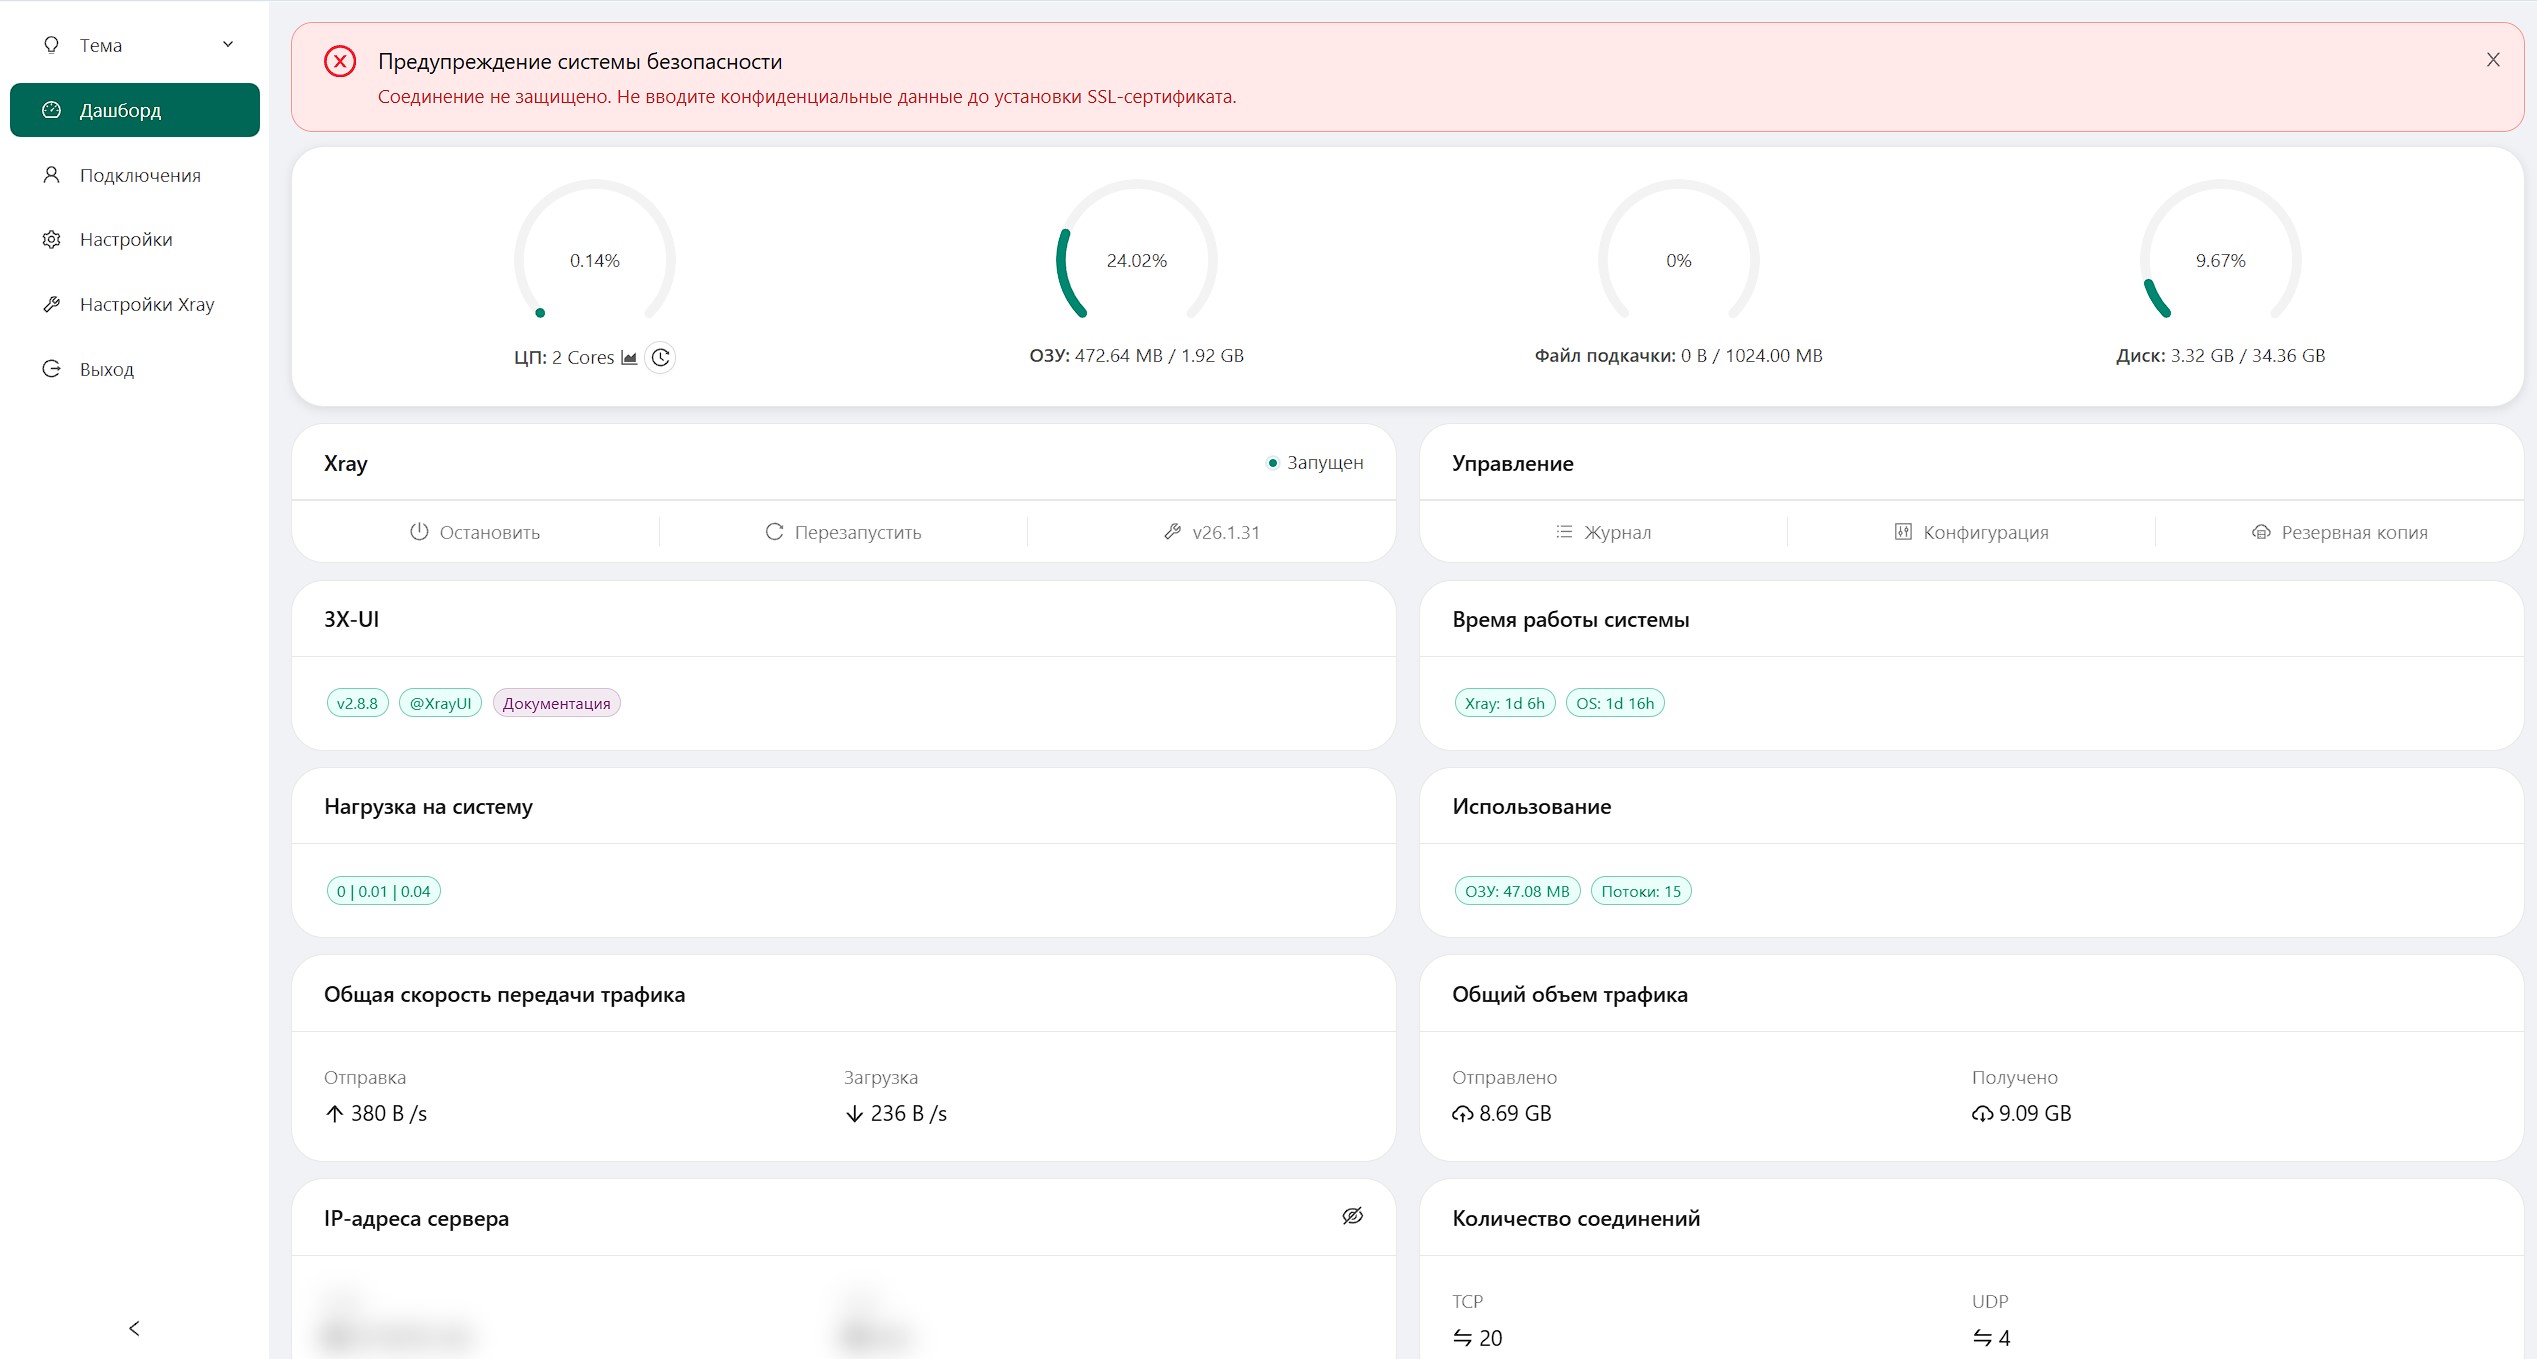
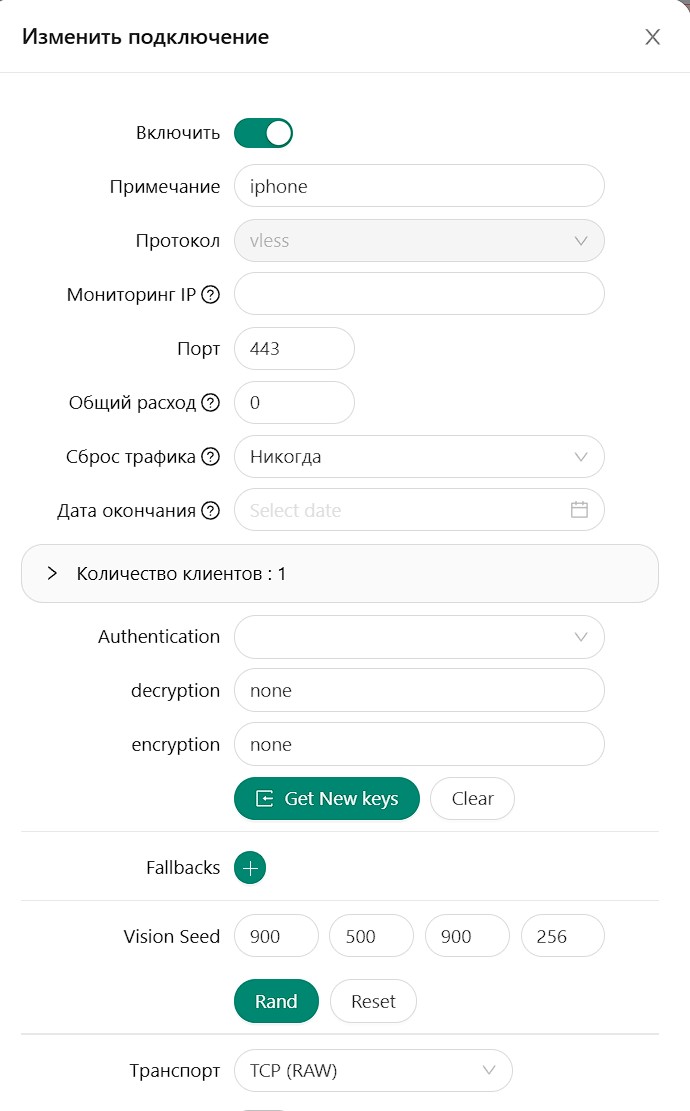
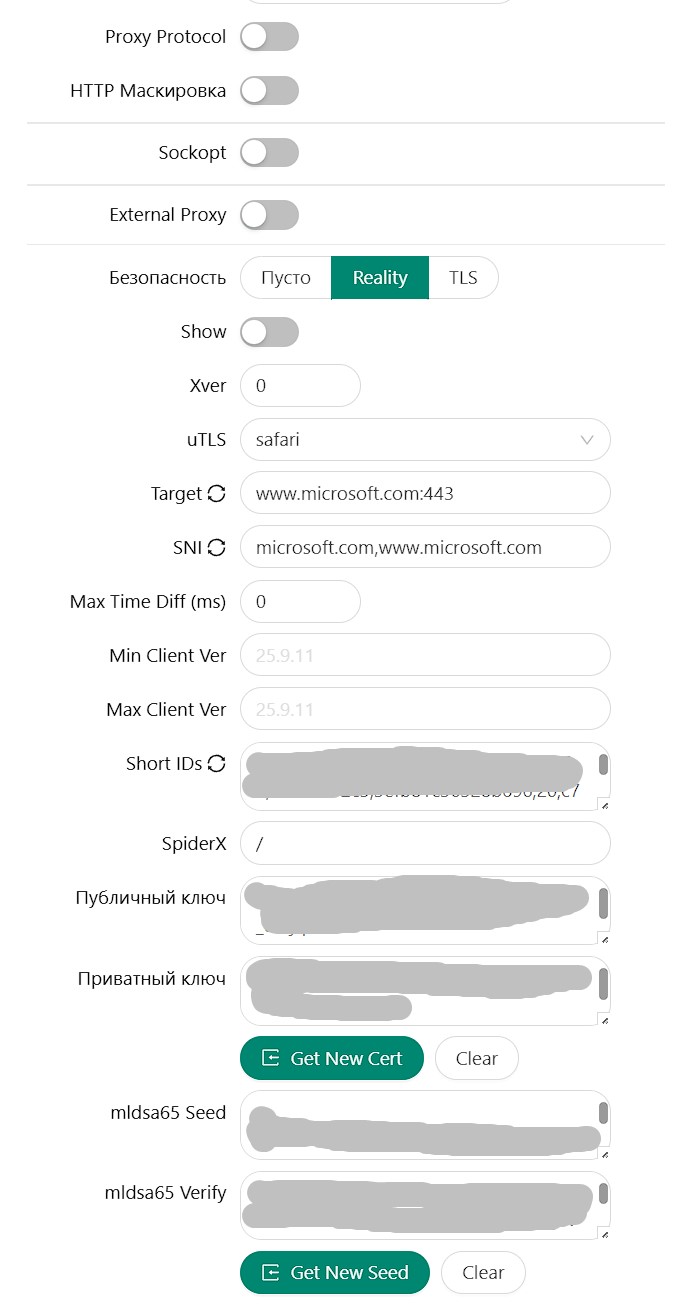
I open the panel in a browser and create a new connection:
- Protocol: VLESS
- Port: 443
- Security: Reality
- uTLS: safari (for iPhone)
- Dest: www.microsoft.com:443
- SNI: microsoft.com, www.microsoft.com
- Flow: xtls-rprx-vision
I click “Get New Cert” to generate Reality keys, fill in the client details, and create the inbound.
About choosing the masquerade domain (Dest/SNI): I use microsoft.com because it’s a major, stable site with servers worldwide. But if you notice speed or connection issues, you can try other domains. Good options include major CDN sites (Cloudflare, Akamai), university websites in your server’s location, or other tech giants (apple.com, google.com). The key requirement: the site must support TLS 1.3 and HTTP/2.
Second Problem: The IP Turned Out to Be Datacenter
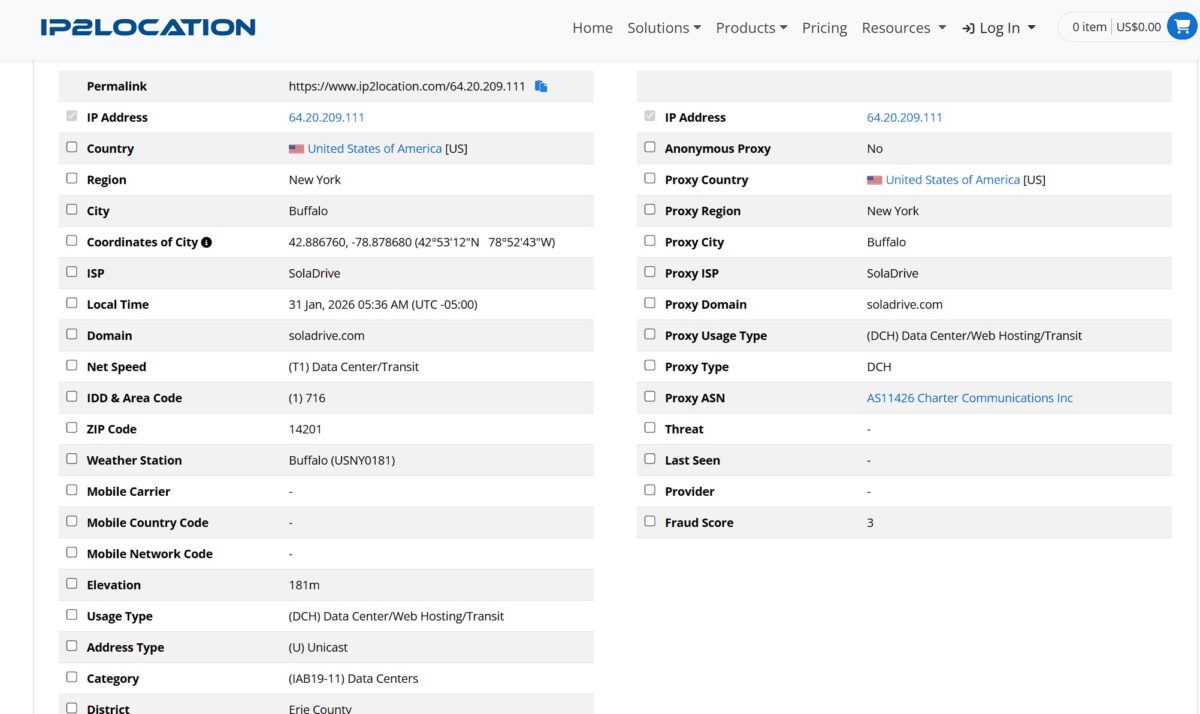
Excited, I connect from my iPhone and head to ip2location.com to check the results. And I see:
Usage Type: (DCH) Data Center/Web Hosting/Transit
So the IP address I paid $25 for as a Residential IP is actually a regular datacenter one. You can get these from any hosting provider for $3–5.
I write to SolaDrive support:
Hello, I purchased this VPS specifically for the advertised “Residential IP” feature. However, when checking via ip2location.com, my IP is flagged as (DCH) Data Center / Hosting, not ISP/Residential. My work requires a clean residential ISP status. Could you please swap this IP for a genuine Residential one that’s correctly tagged in major databases?
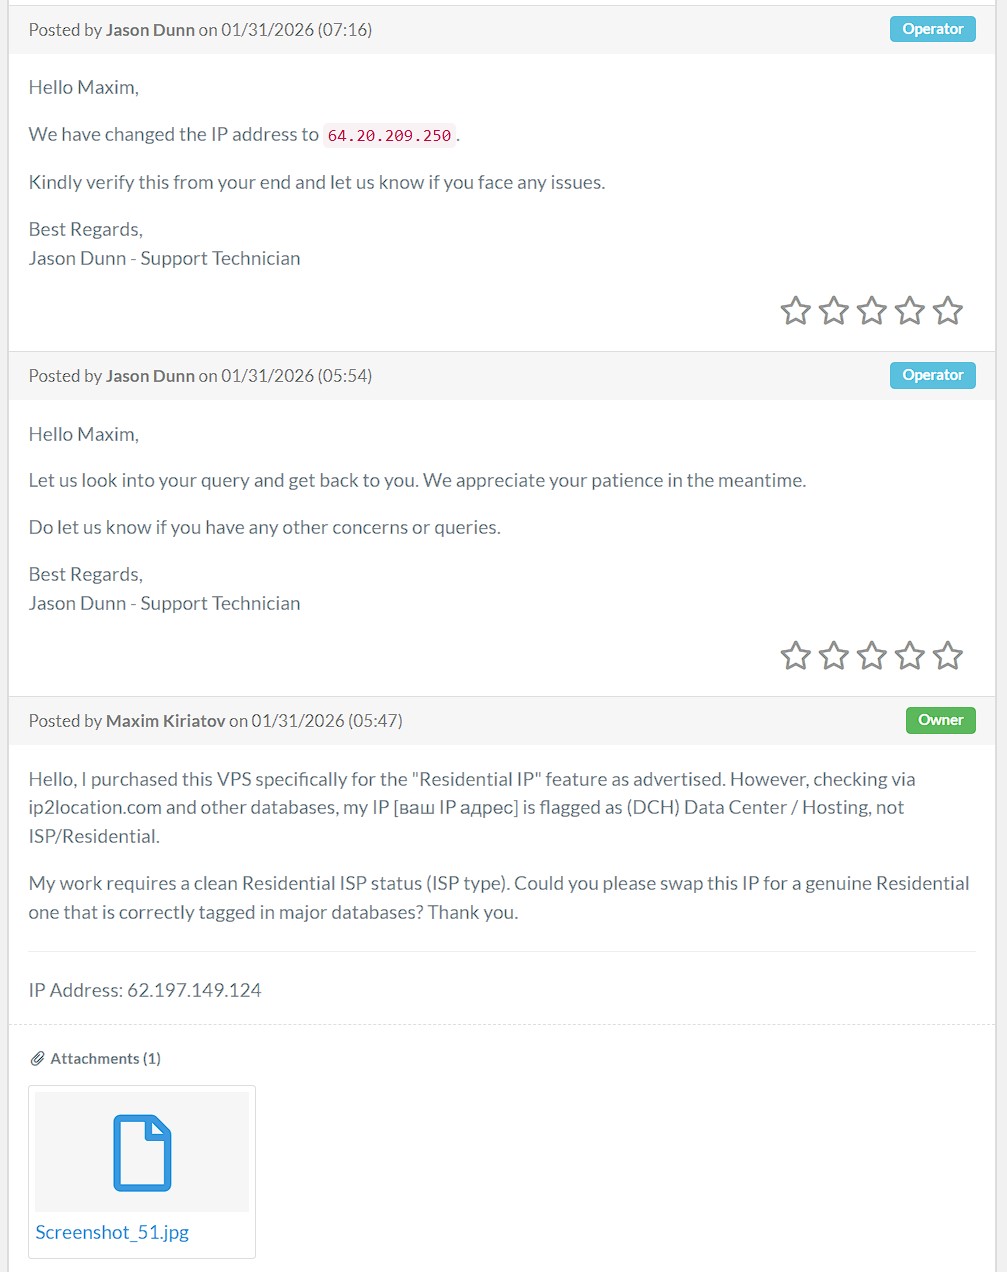
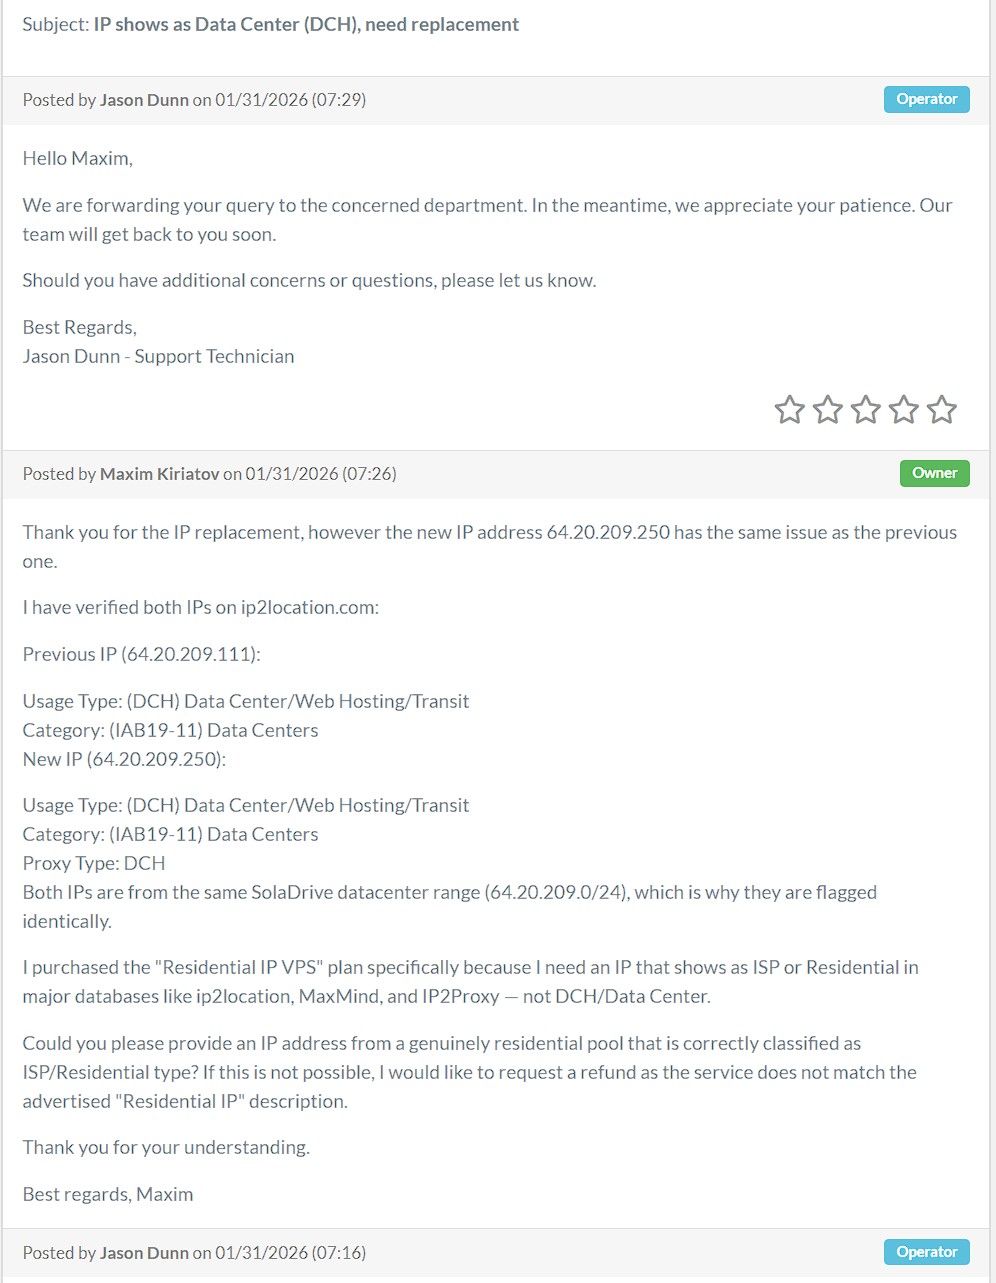
A few hours later I get a response: IP changed to 64.20.209.250. I check it—still DCH. Both addresses are from the same 64.20.209.0/24 block, which belongs to SolaDrive and is classified as datacenter.
I write back, more firmly this time:
Thank you for the IP replacement, however the new IP address 64.20.209.250 has the same issue. Both IPs are from the same SolaDrive datacenter range (64.20.209.0/24), which is why they’re flagged identically. I purchased the “Residential IP VPS” plan specifically because I need an IP that shows as “ISP” or “Residential” in major databases like ip2location, MaxMind, and IP2Proxy—not “DCH/Data Center.” Could you please provide an IP address from a genuinely residential pool? If this is not possible, I would like to request a refund.
Finally Getting a Real Residential IP
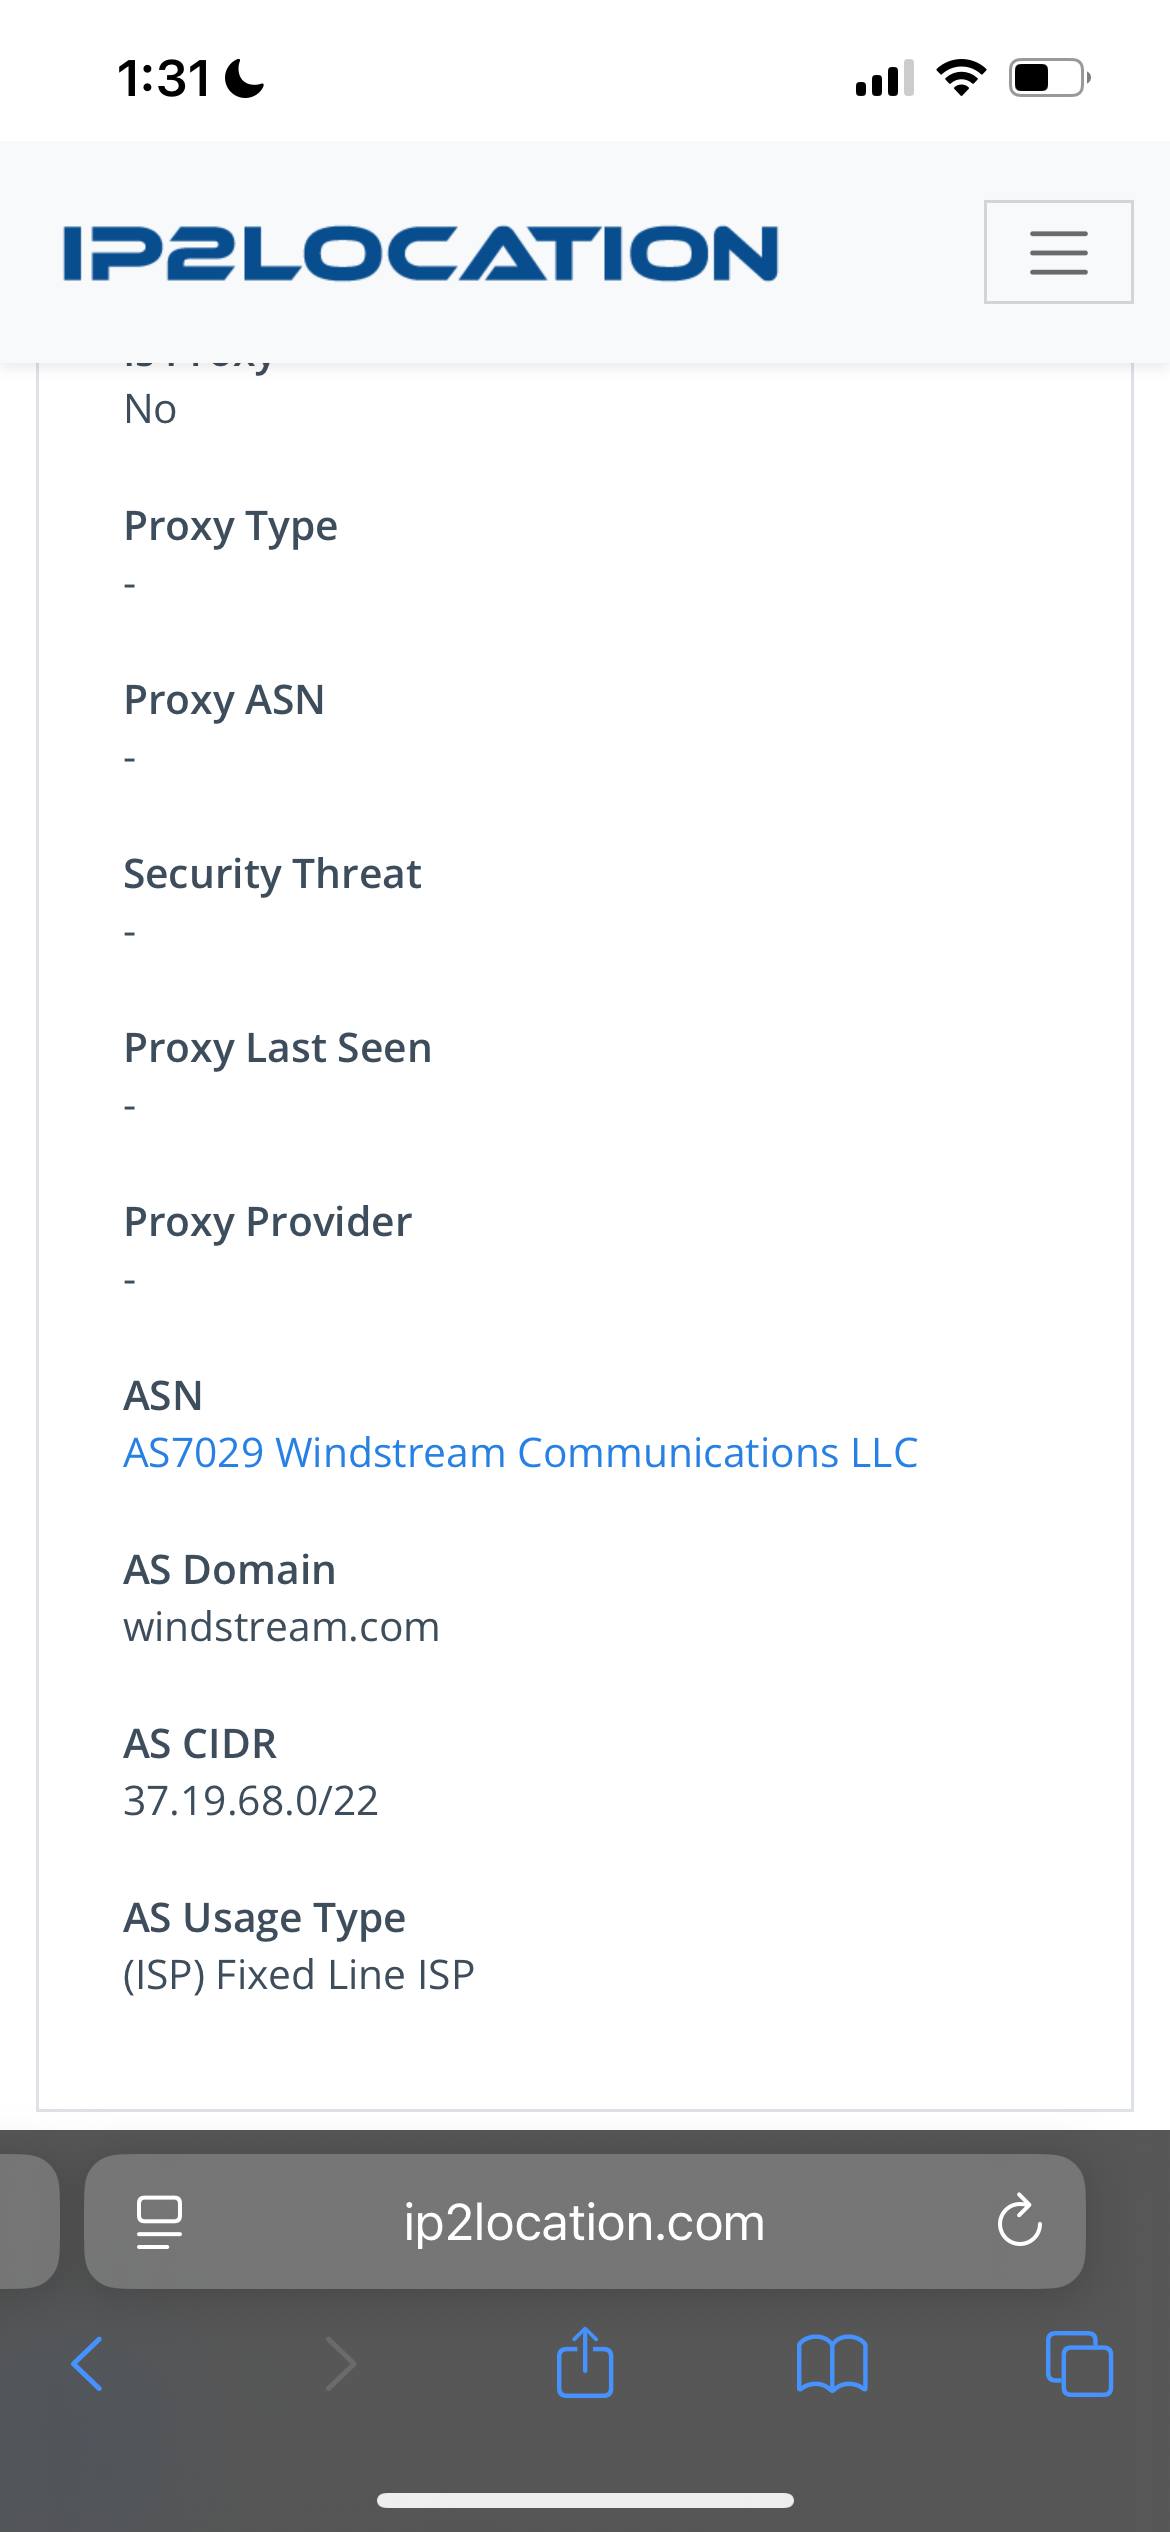
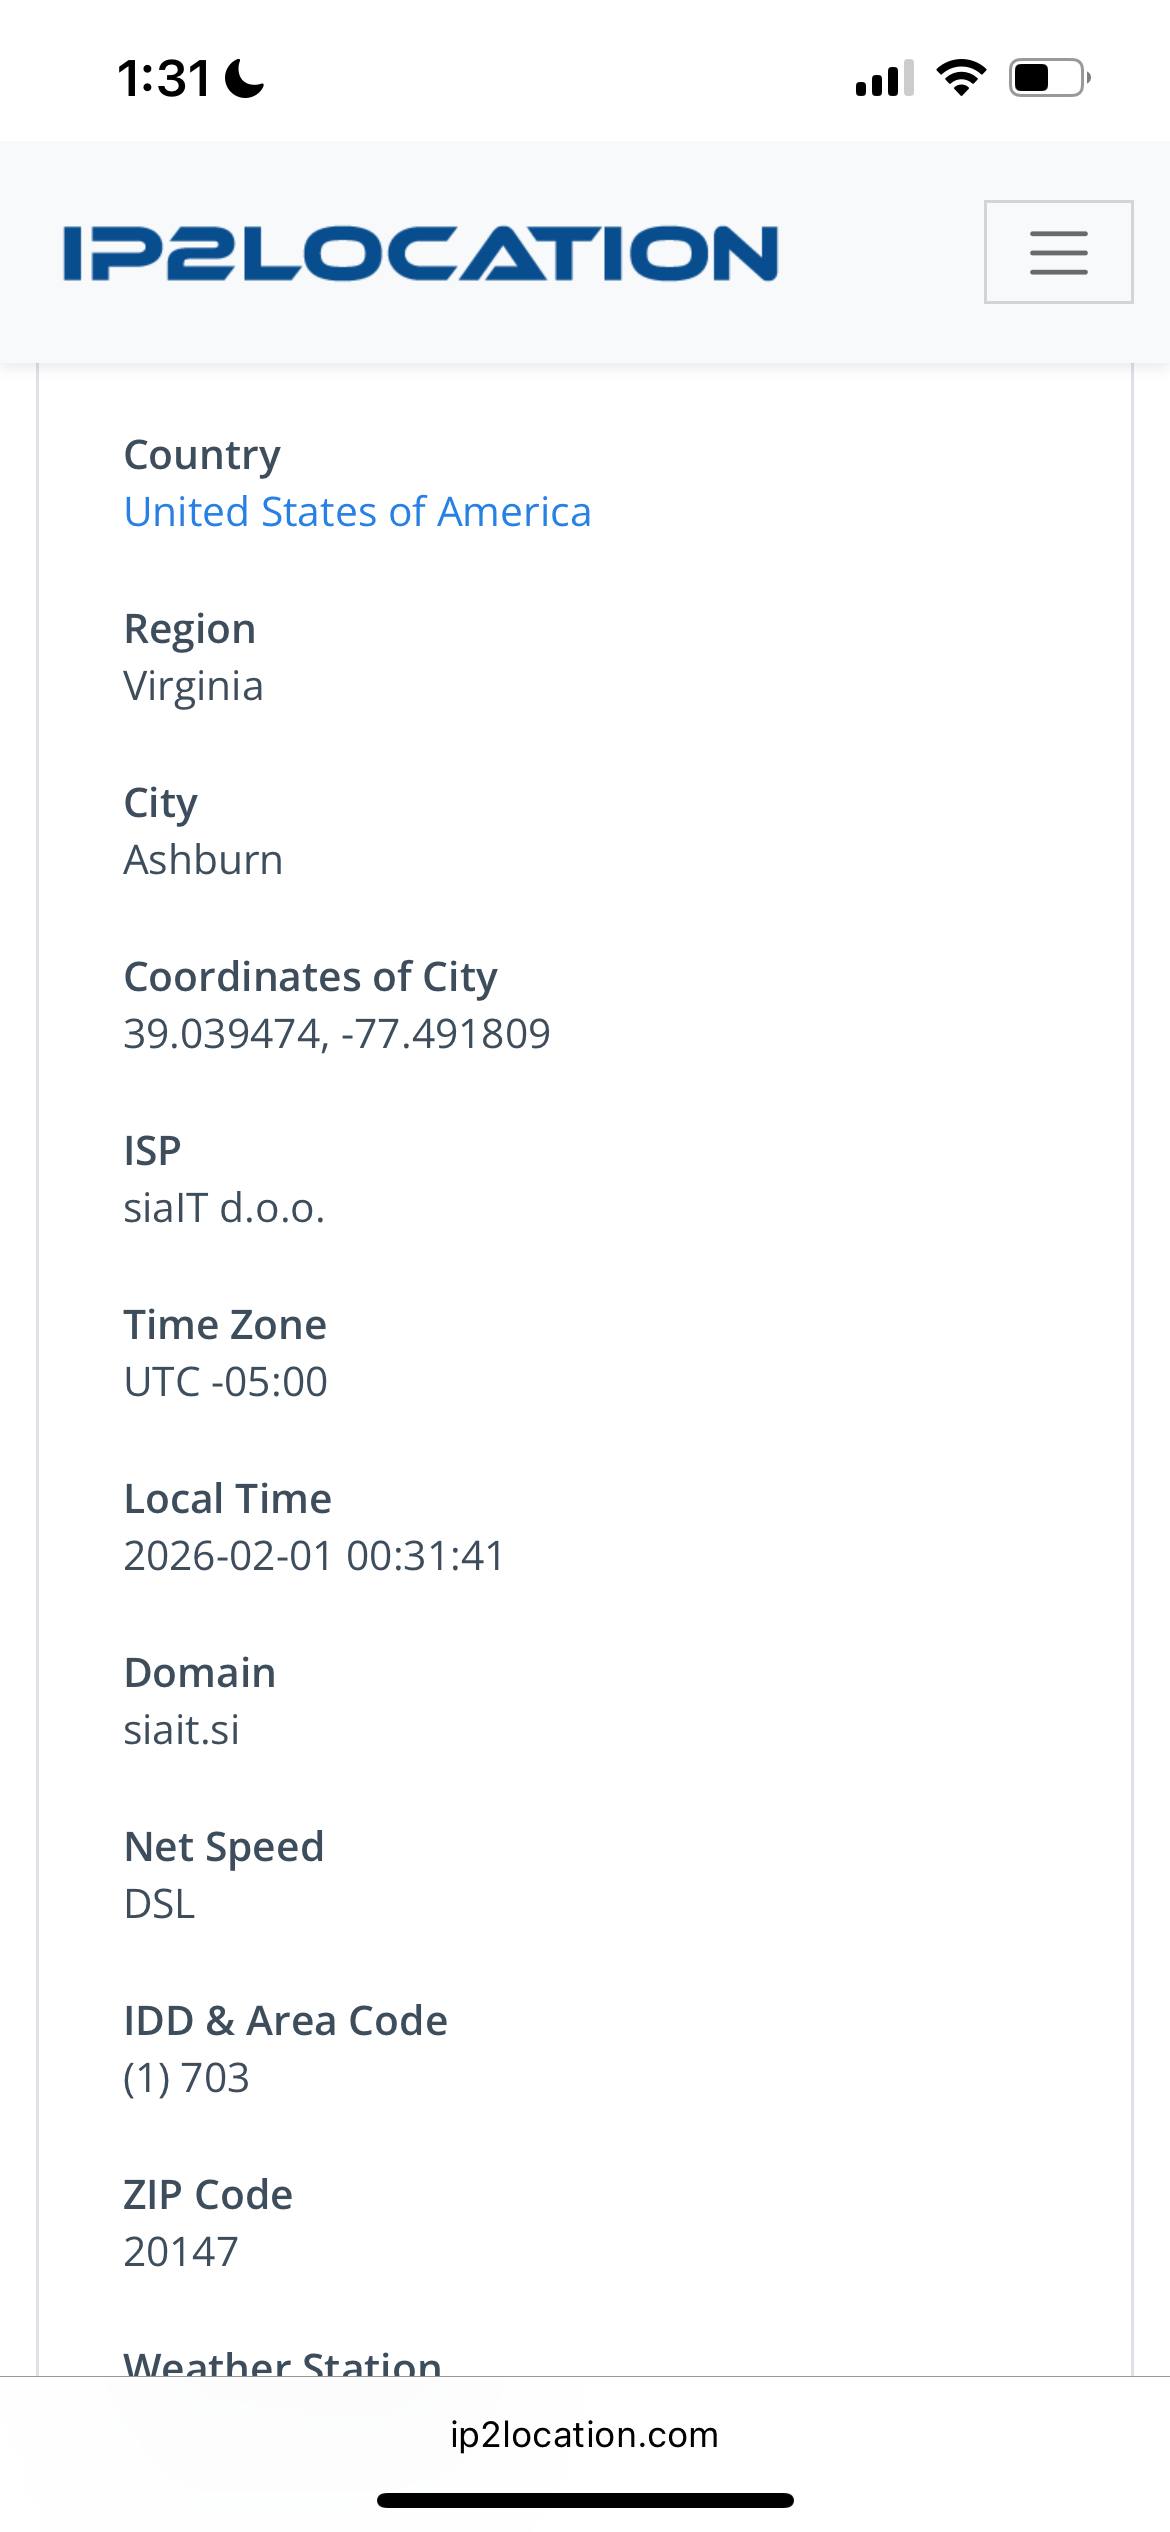
After about 6 hours, support sends me new server credentials. New IP: 37.19.70.xxx. I check it on ip2location:
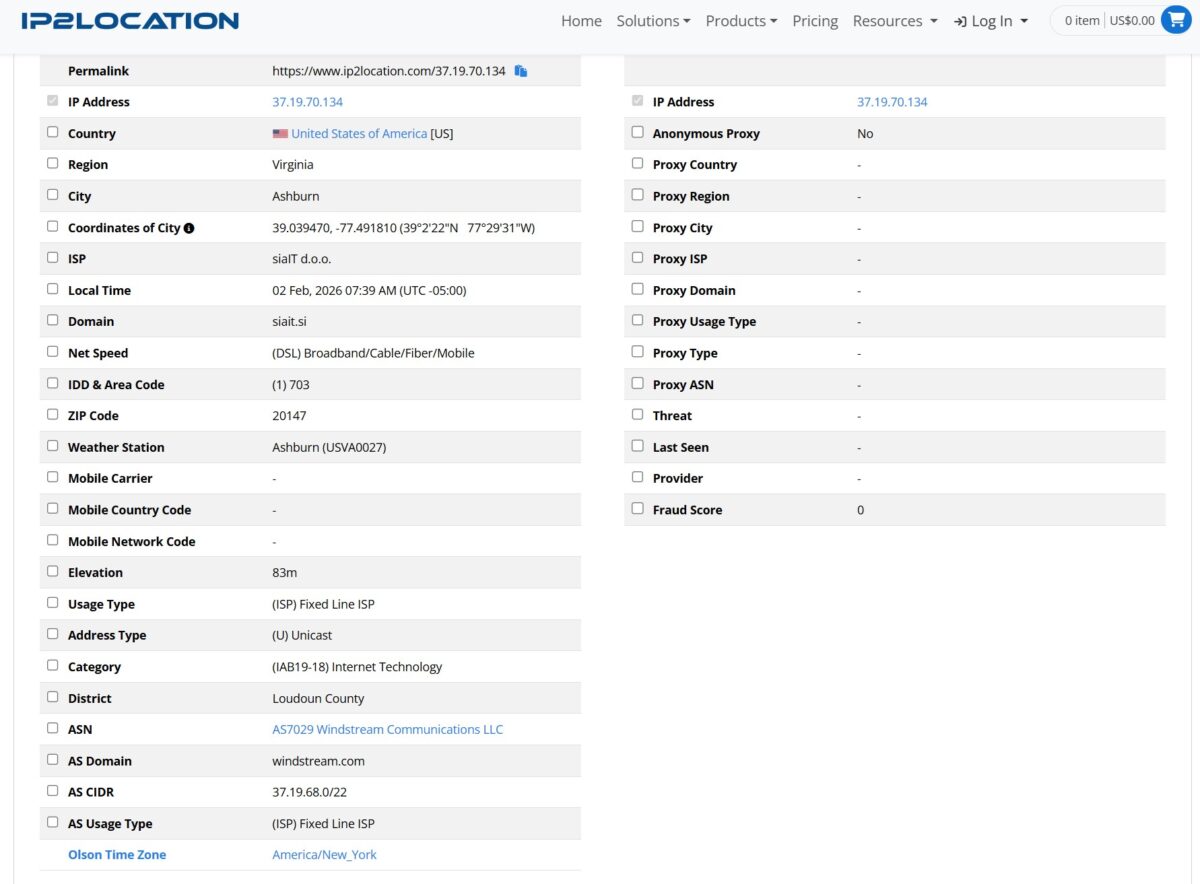
- Usage Type: (ISP) Fixed Line ISP
- ISP: siaIT d.o.o. / Windstream
- Proxy Type: empty
- Fraud Score: 0
Finally, a real residential IP! Time to start the setup from scratch.
Complete Server Setup from Scratch
I connect to the new server and repeat all the security steps:
apt update && apt full-upgrade -y
adduser maxim
usermod -aG sudo maxim
I configure SSH on a non-standard port, disable root. Install 3X-UI:
bash <(curl -Ls https://raw.githubusercontent.com/mhsanaei/3x-ui/master/install.sh)I create the VLESS + Reality connection with the same parameters:
- Protocol: VLESS
- Port: 443
- Security: Reality
- uTLS: safari
- Dest: www.microsoft.com:443
- SNI: microsoft.com, www.microsoft.com
- Flow: xtls-rprx-vision
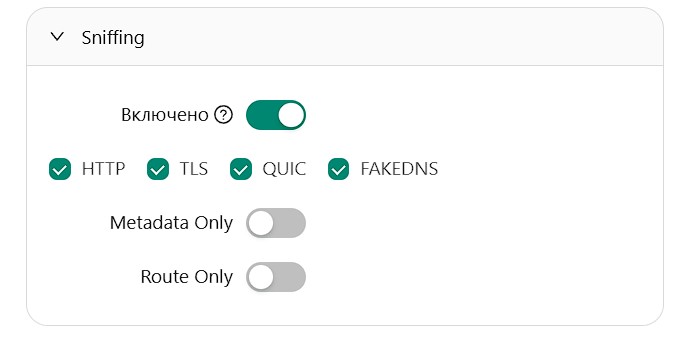
- Sniffing: HTTP, TLS, QUIC, FAKEDNS enabled
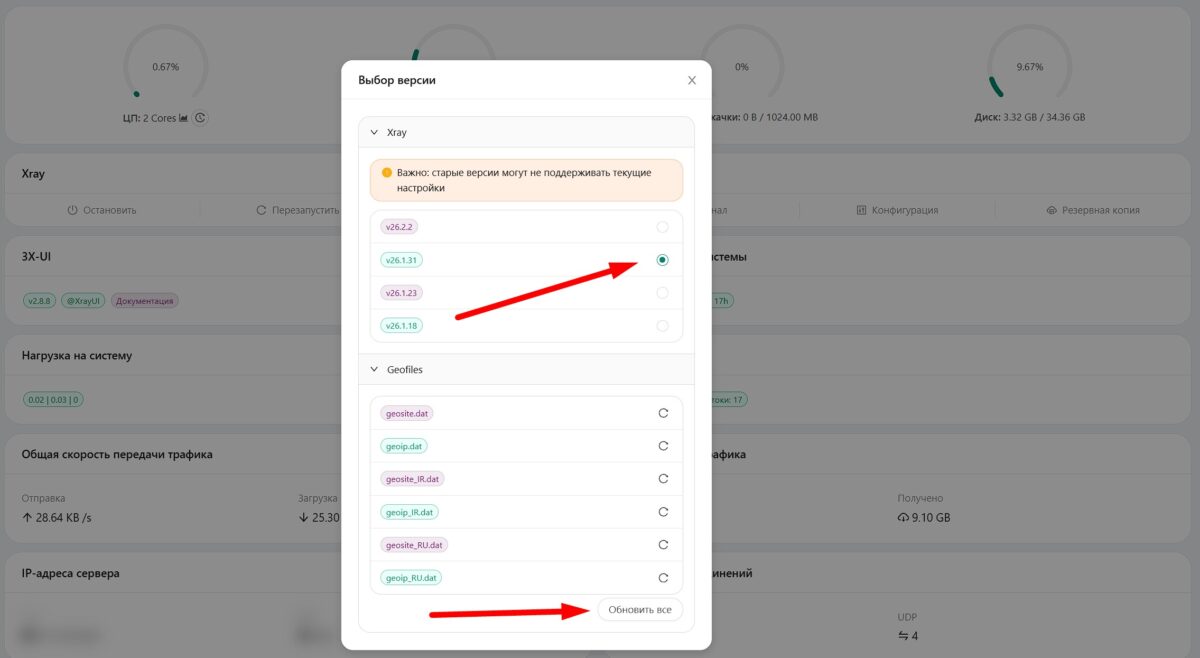
In the panel, I update Xray to the latest version and download fresh Geo files for routing.
Setting Up the Client on iPhone
I install v2RayTun from the App Store (alternatives include V2Box, Streisand, or Hiddify). I scan the QR code from the 3X-UI panel.

In the app settings, I enable:
- Persistent tunnel: enabled
- Exclude APNs: enabled (so push notifications work)
- Exclude Cellular Services: enabled
- Exclude local networks: enabled
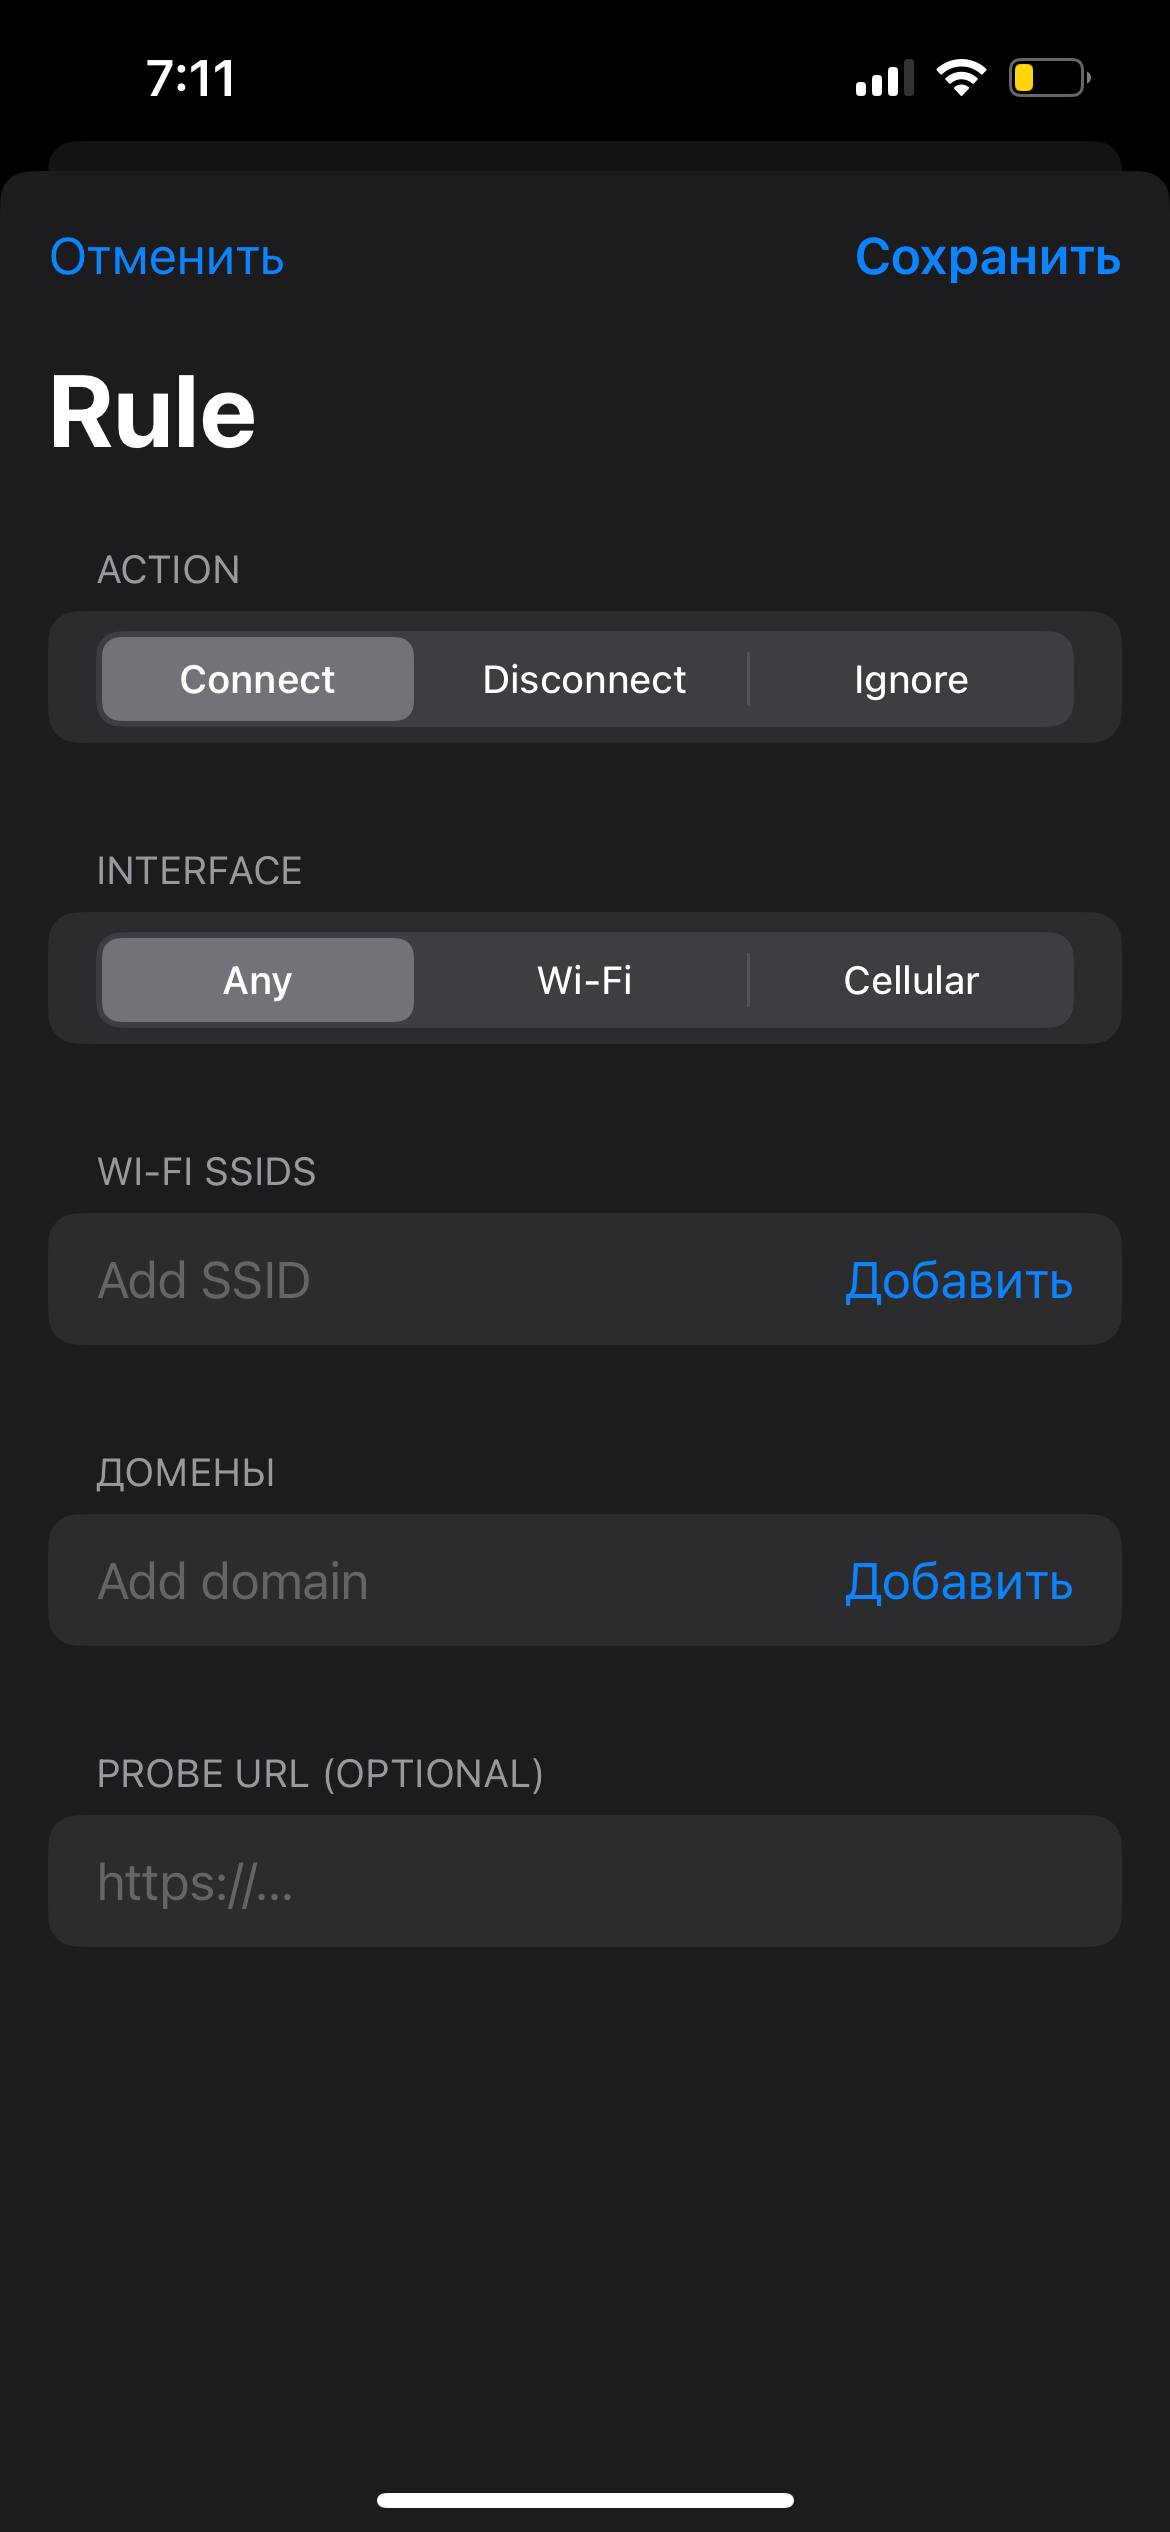
I set up auto-connect via On Demand:
- Action: Connect;
- Interface: Any;
- Probe URL: https://www.google.com (optional).
Now the VPN will connect automatically whenever I get internet access.
Testing the Masquerade
I connect and run checks on several services.
- IP: 37.19.70.xxx (United States)
- ISP: Windstream Communications LLC
- Usage Type: (ISP) Fixed Line ISP
- Proxy: No
- Fraud Score: 0
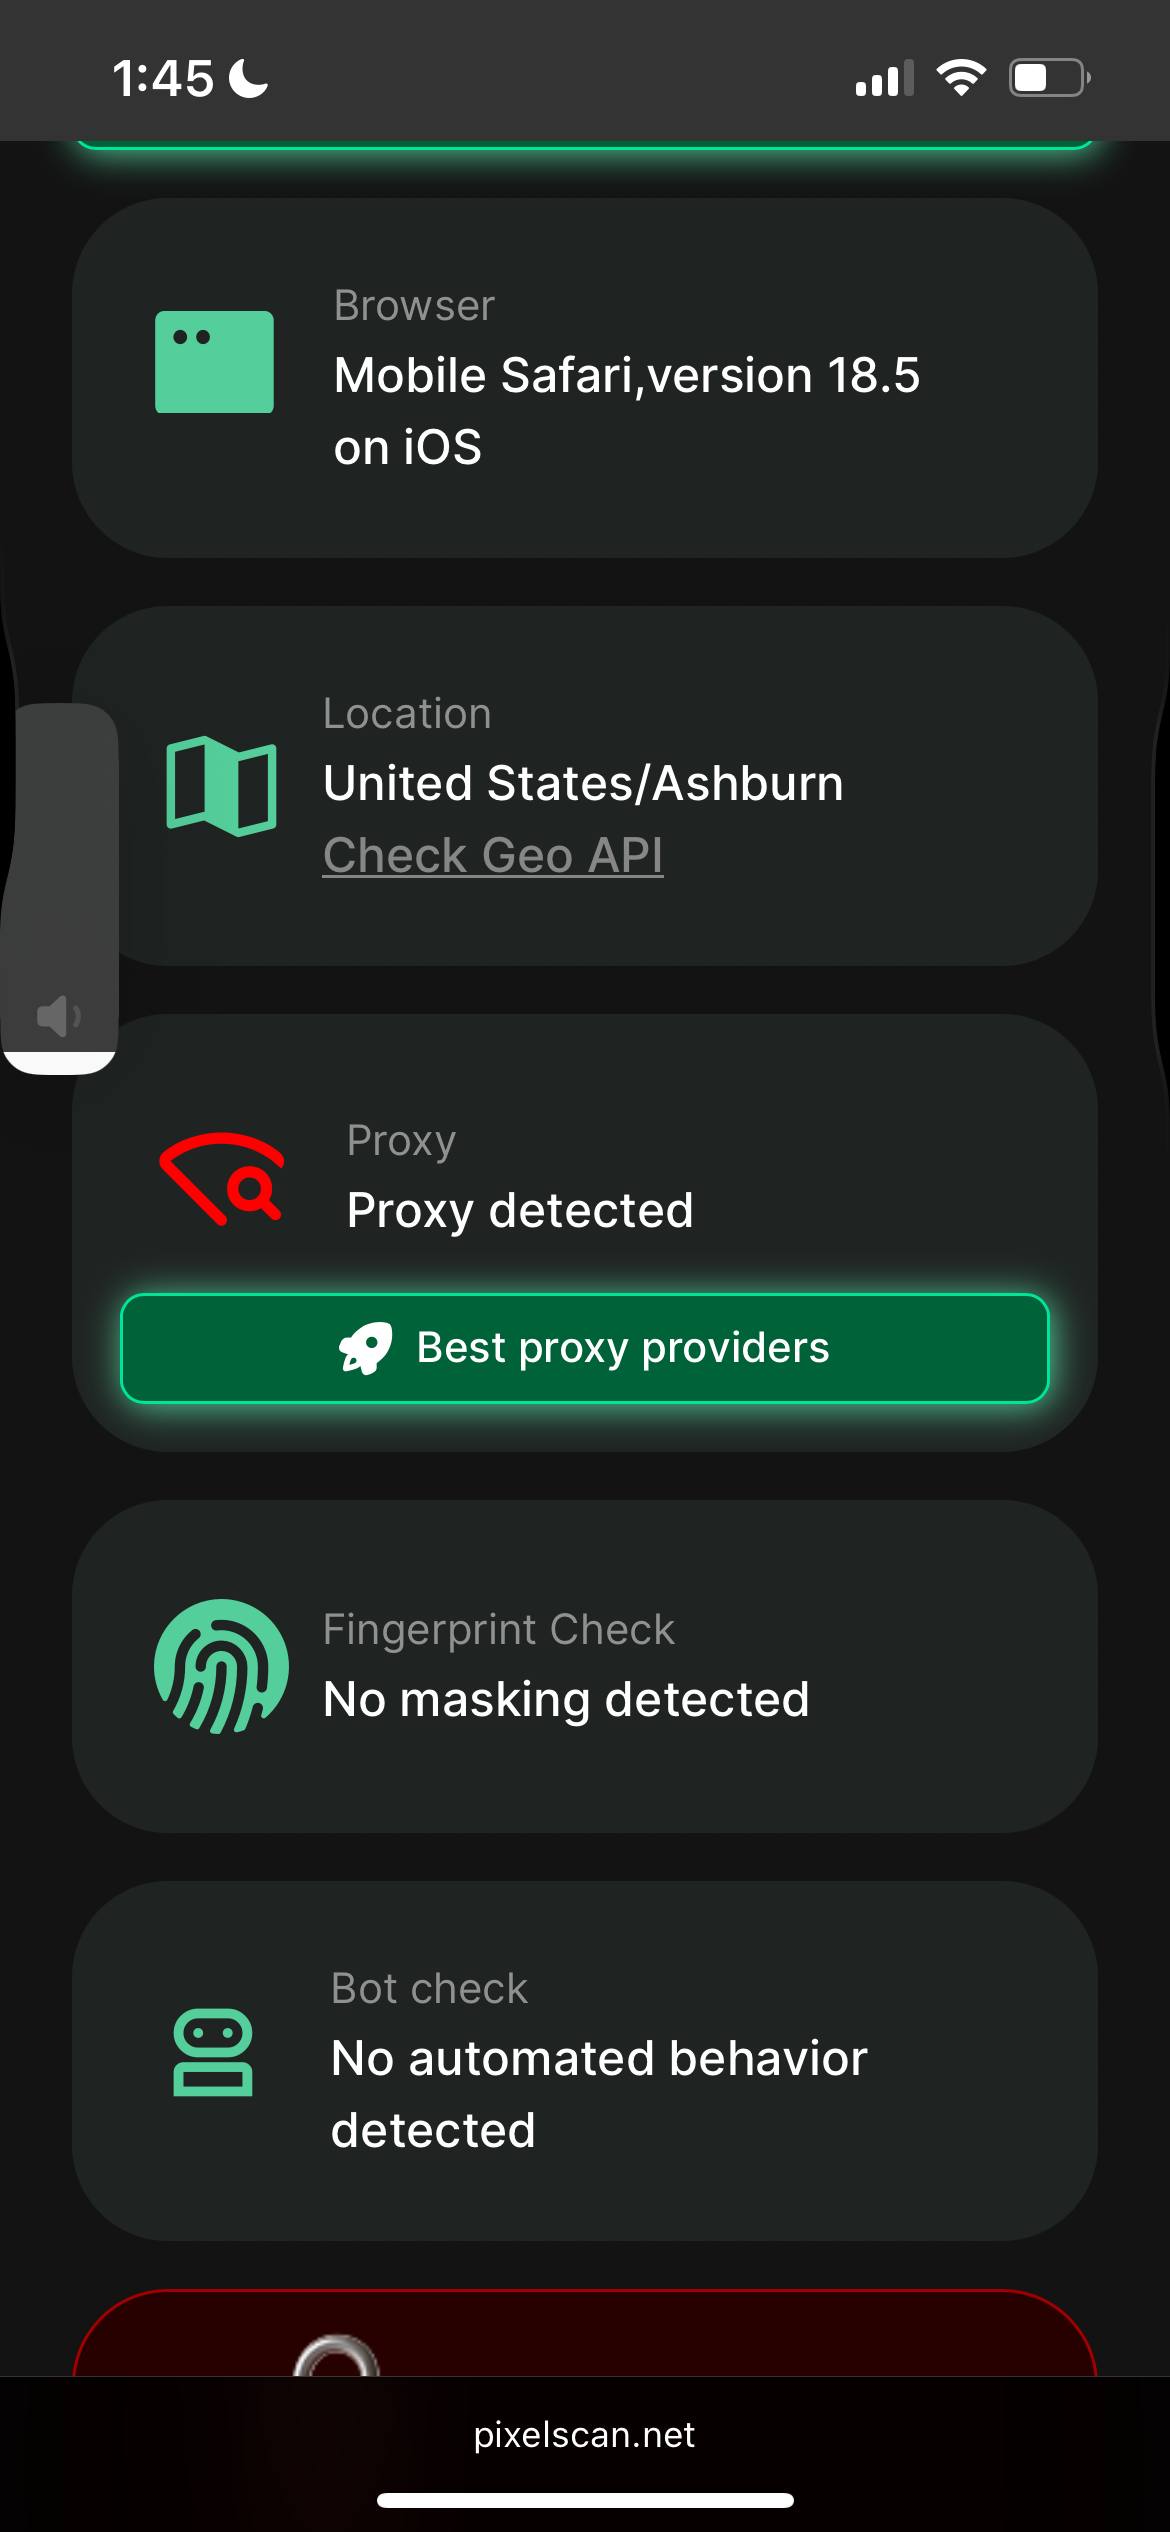
- Browser: Mobile Safari 18.5 ✓
- Location: United States/Ashburn ✓
- Fingerprint Check: No masking detected ✓
- Bot check: No automated behavior detected ✓
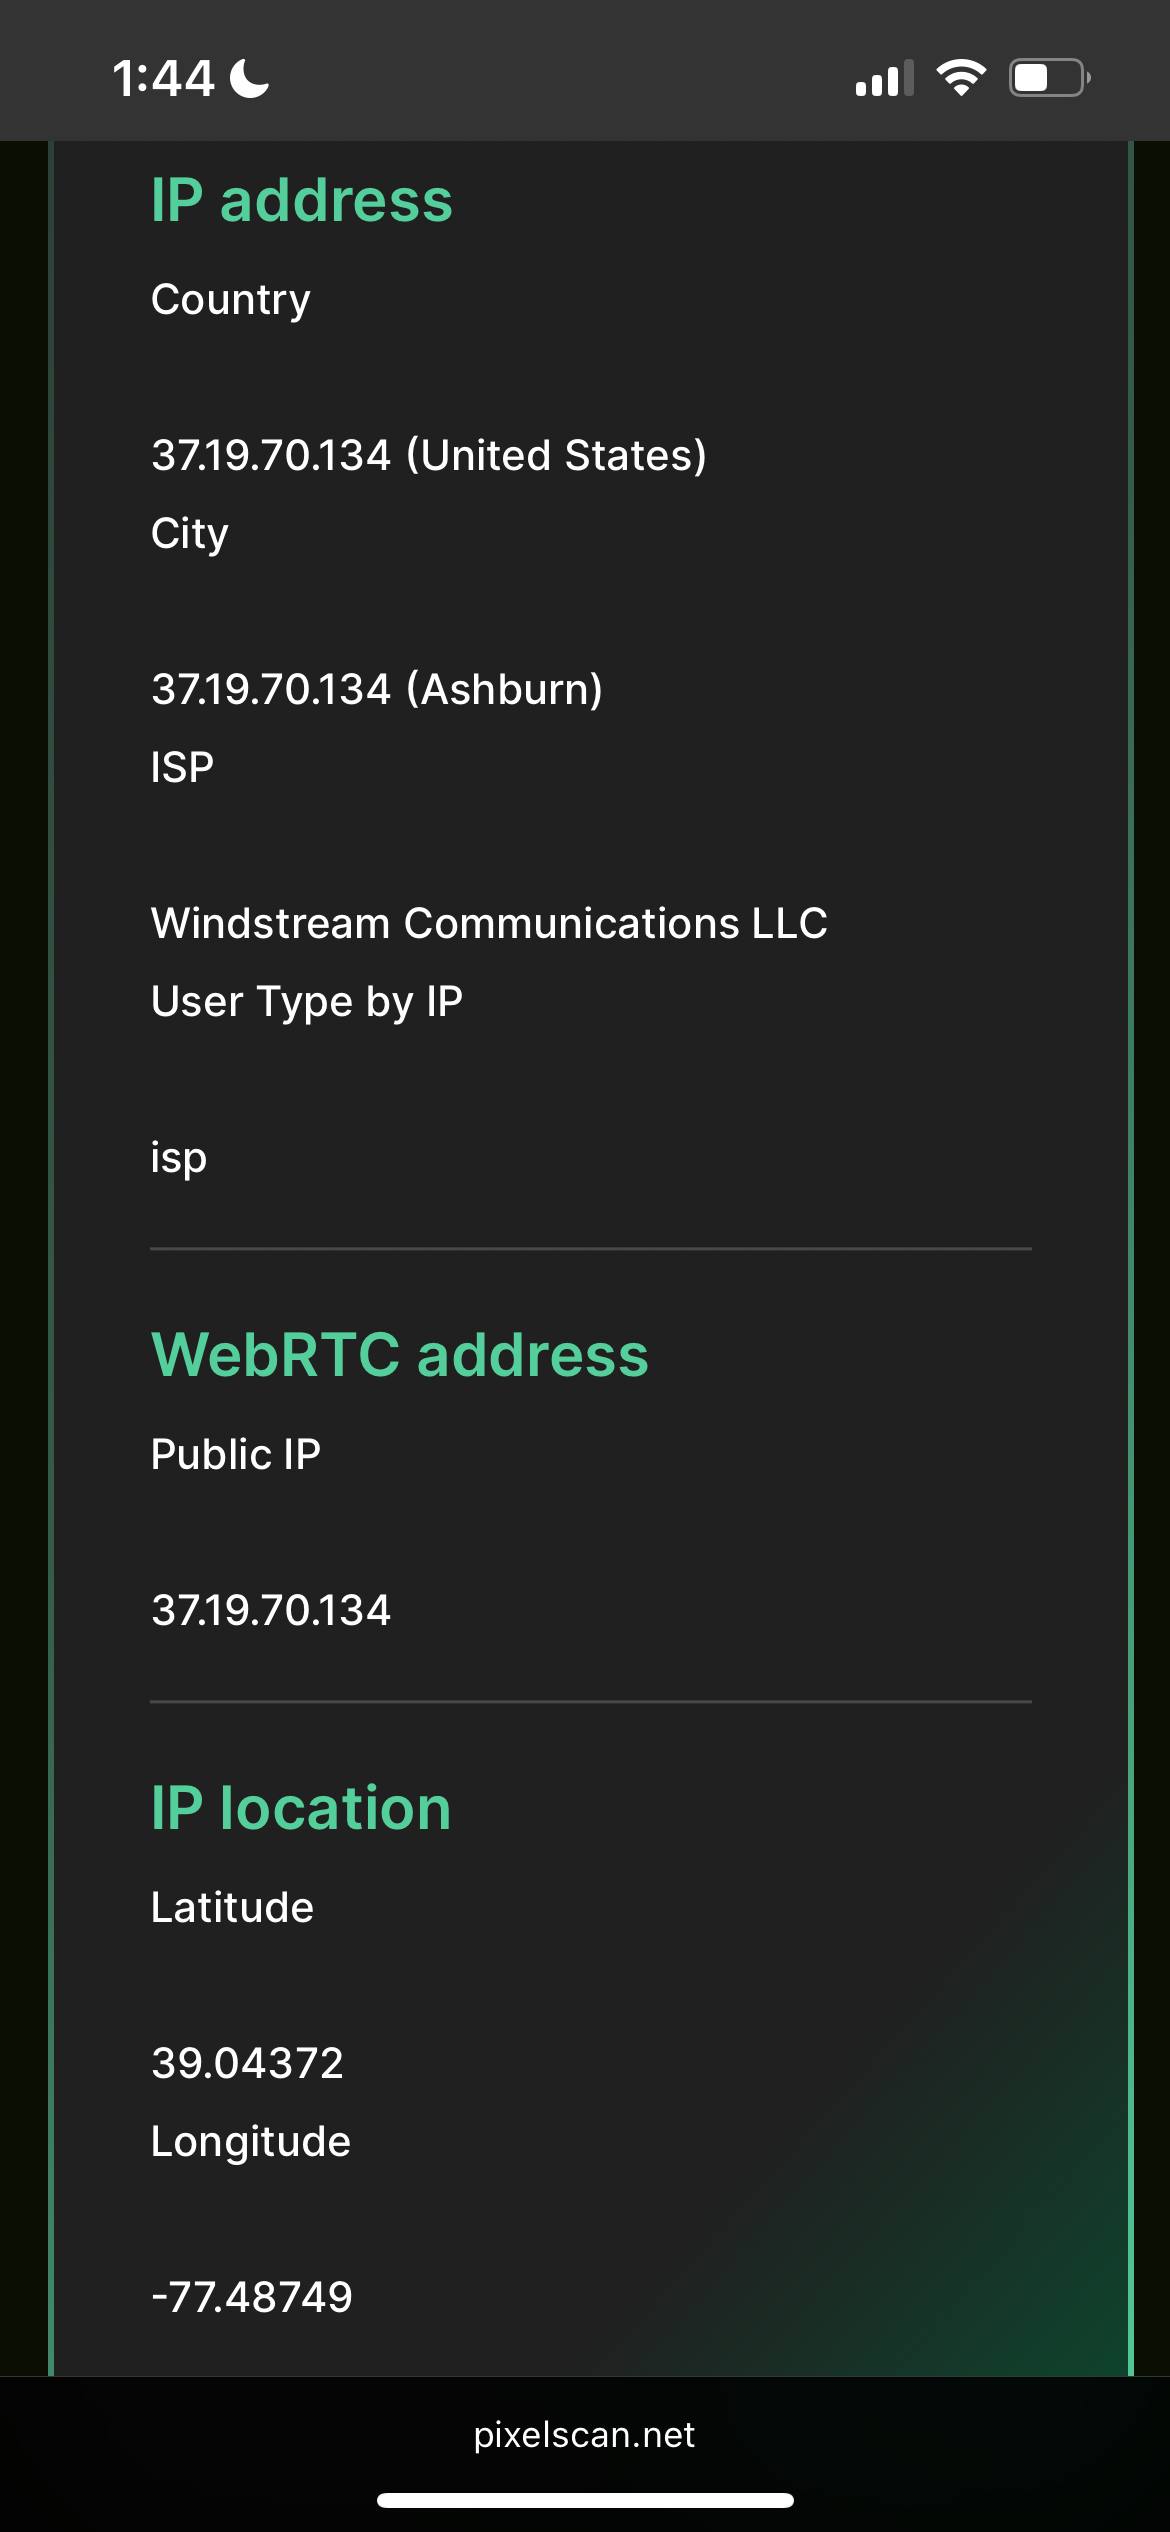
- WebRTC: 37.19.70.xxx (matches, no leaks) ✓
- Timezone: America/New_York ✓
Pixelscan shows “Proxy detected,” but the User Type by IP displays as “isp.” This is a quirk of their algorithm: they use multiple databases, and one of them flags the siaIT range as suspicious. For Facebook, this isn’t critical—it relies on ip2location and MaxMind, where the IP is clean.
DNS Leak Test:
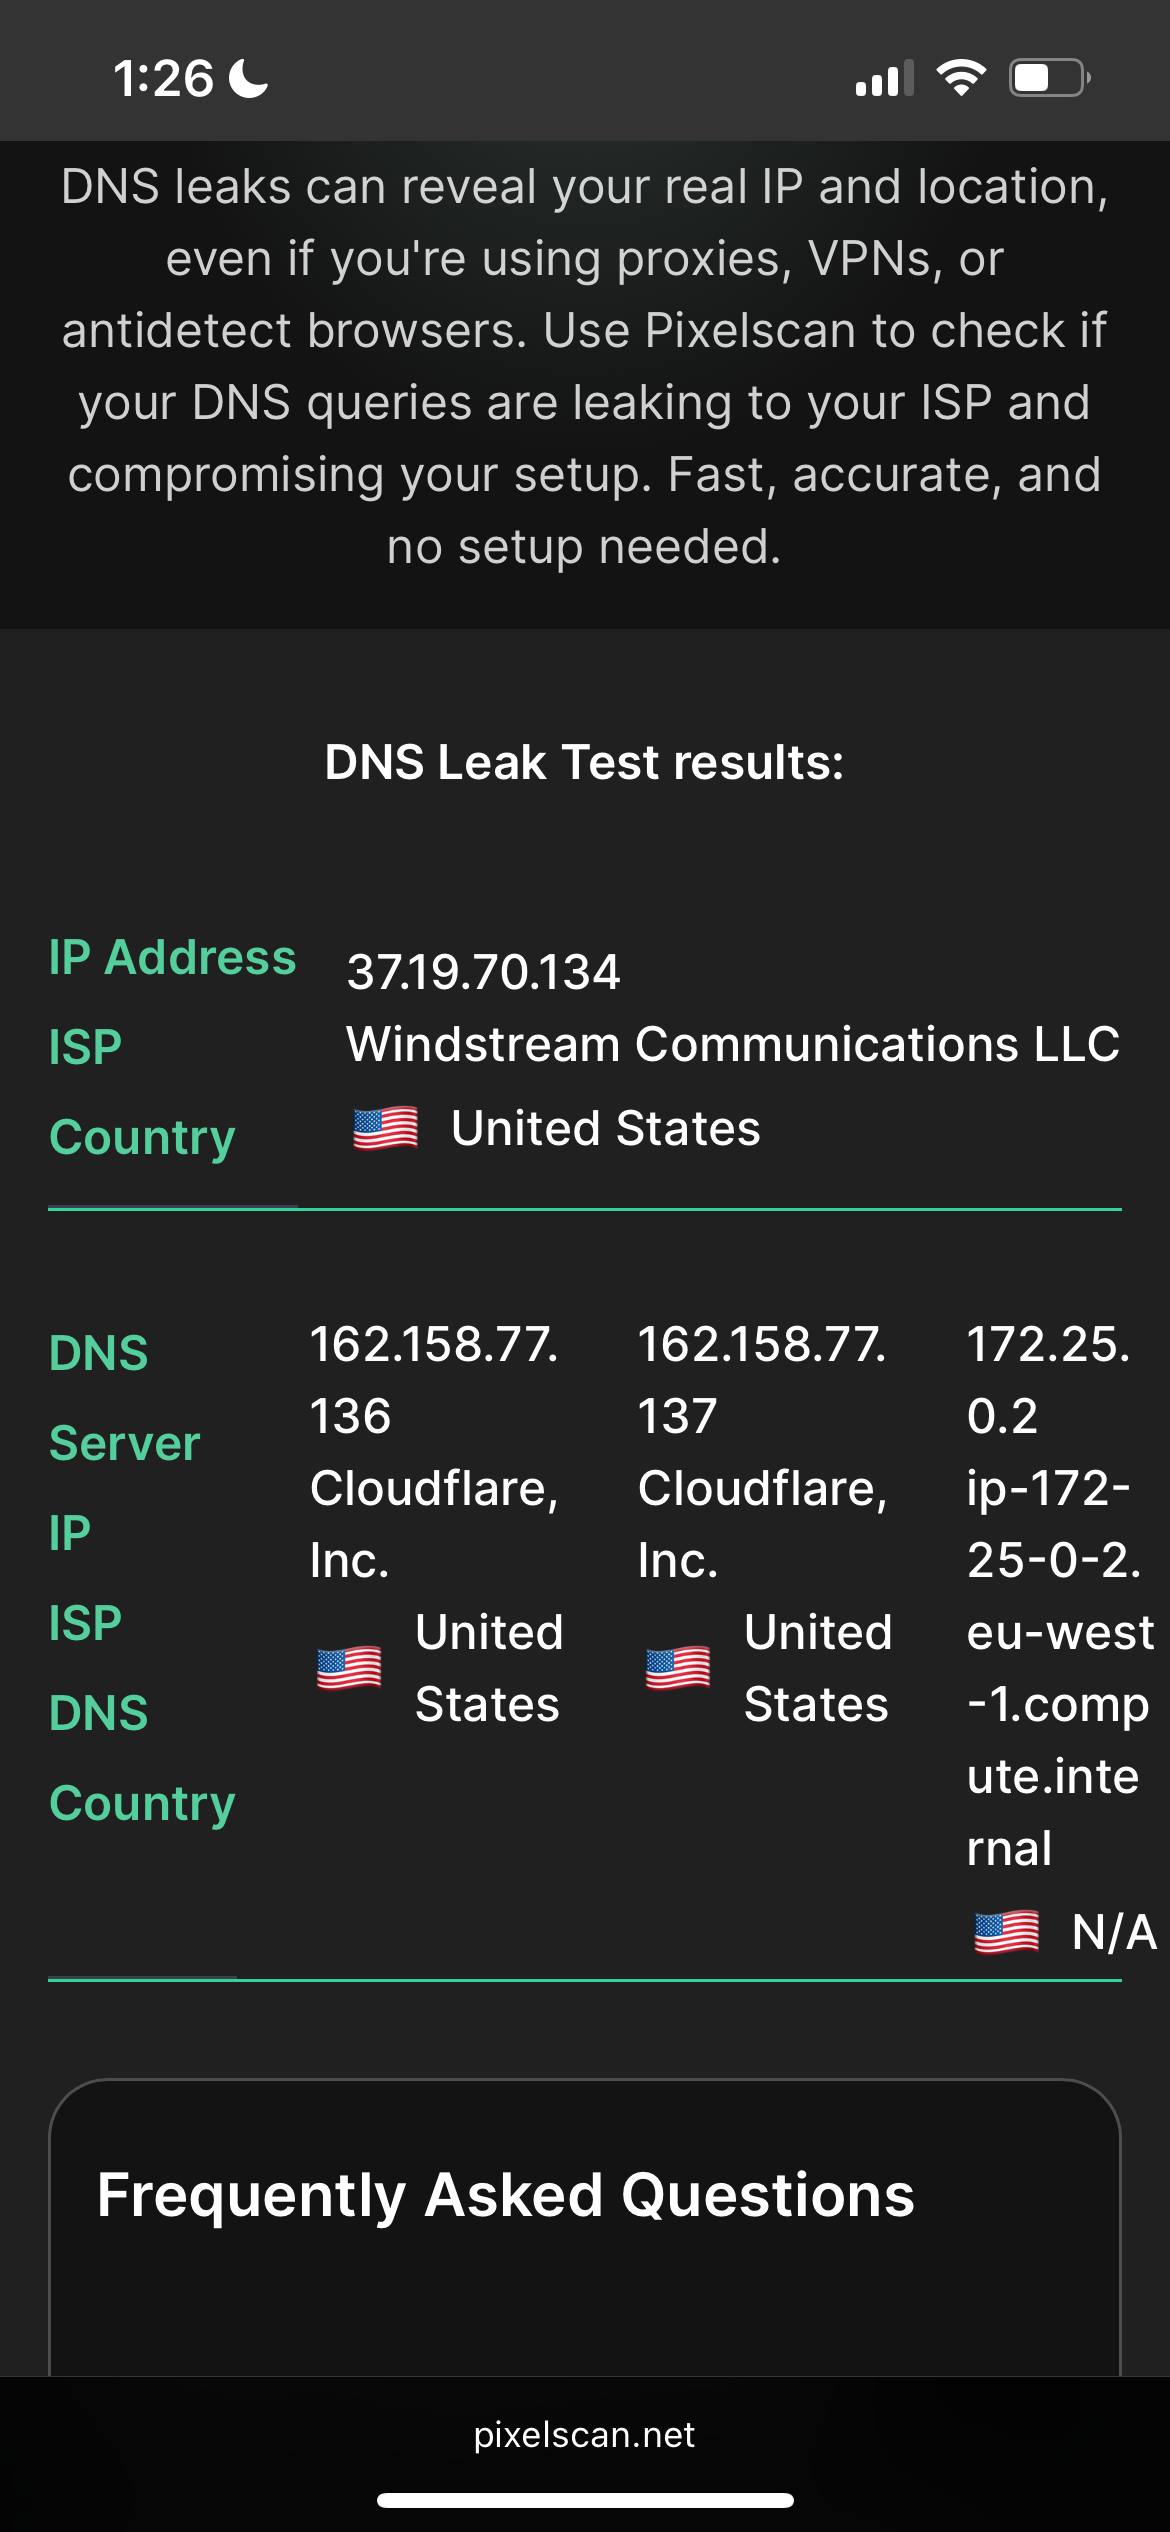
DNS queries go through Cloudflare (162.158.77.136/137), my real ISP isn’t exposed.
Final Configuration
Here’s what I ended up with:
Server:
- Provider: SolaDrive (soladrive.com)
- Plan: Residential IP VPS SD-2, $25/month
- Location: Ashburn, Virginia
- IP: 37.19.70.xxx (Windstream, ISP type)
- OS: Ubuntu 24.04
- Panel: 3X-UI
Protocol:
- VLESS + Reality
- Port: 443
- Transport: TCP
- Flow: xtls-rprx-vision
- uTLS: safari
- Target: www.microsoft.com:443
Client (iPhone):
- App: v2RayTun
- Persistent tunnel: yes
- On Demand: yes
- Routing: all traffic through VPN
Takeaways and Recommendations
What I learned through this process:
- Not all “Residential IPs” are created equal. Even reputable providers might hand you a datacenter IP on the first try. Always check ip2location.com right after getting access.
- Don’t be afraid to push back with support. I asked for IP replacements twice and eventually got what I paid for. If they’re selling Residential, you have every right to demand Residential.
- Check the IP before setting up everything else. I deployed the whole infrastructure first, then discovered the IP problem. Do it the other way around.
- uTLS must match your device. If you’re on iPhone, use safari. Android or Windows—use chrome. Fingerprint mismatches raise red flags.
- $25 for a real Residential IP is a fair price. You’re unlikely to find anything quality for less. Anything at $5–10 is almost guaranteed to be DCH.
- Reality actually works. Traffic gets masked as regular HTTPS, and not a single service detected I was using a VPN. For social media, this is crucial.
It’s been a week since I finished the setup. My Instagram reach is back to normal, and Facebook stopped showing suspicious activity warnings. Mission accomplished.


I appreciate, result in I discovered just what I used to be having a look for. You have ended my 4 day long hunt! God Bless you man. Have a great day. Bye